In this how-to, we’ll look at thezipcommand, a useful utility that enables us to specify lists of files, set a level of data compression and create compressed archives.
Whilst you become accustomed to these commands it’s good to work with example test files and directories and you should take extra care to ensure you are carefully following the instructions.

All the commands in this how-to will work on most Linux machines. We’ve used an Ubuntu LTS install but you could run this how-to on aRaspberry Pi. All of the how-to is performed via the Terminal. you may open a terminal window on most Linux machines by pressingctrl, altandt.
Creating a Zip Archive in Linux
To begin, let’s create some empty test files and then add them to an archive. We’ll use thetouchcommand to create files, thelscommand to check that the files have been created and then thezipcommand to create a basic archive.
1.Create a test directorywhere we can safely try out the command. Change directory so that you are inside the new directory.
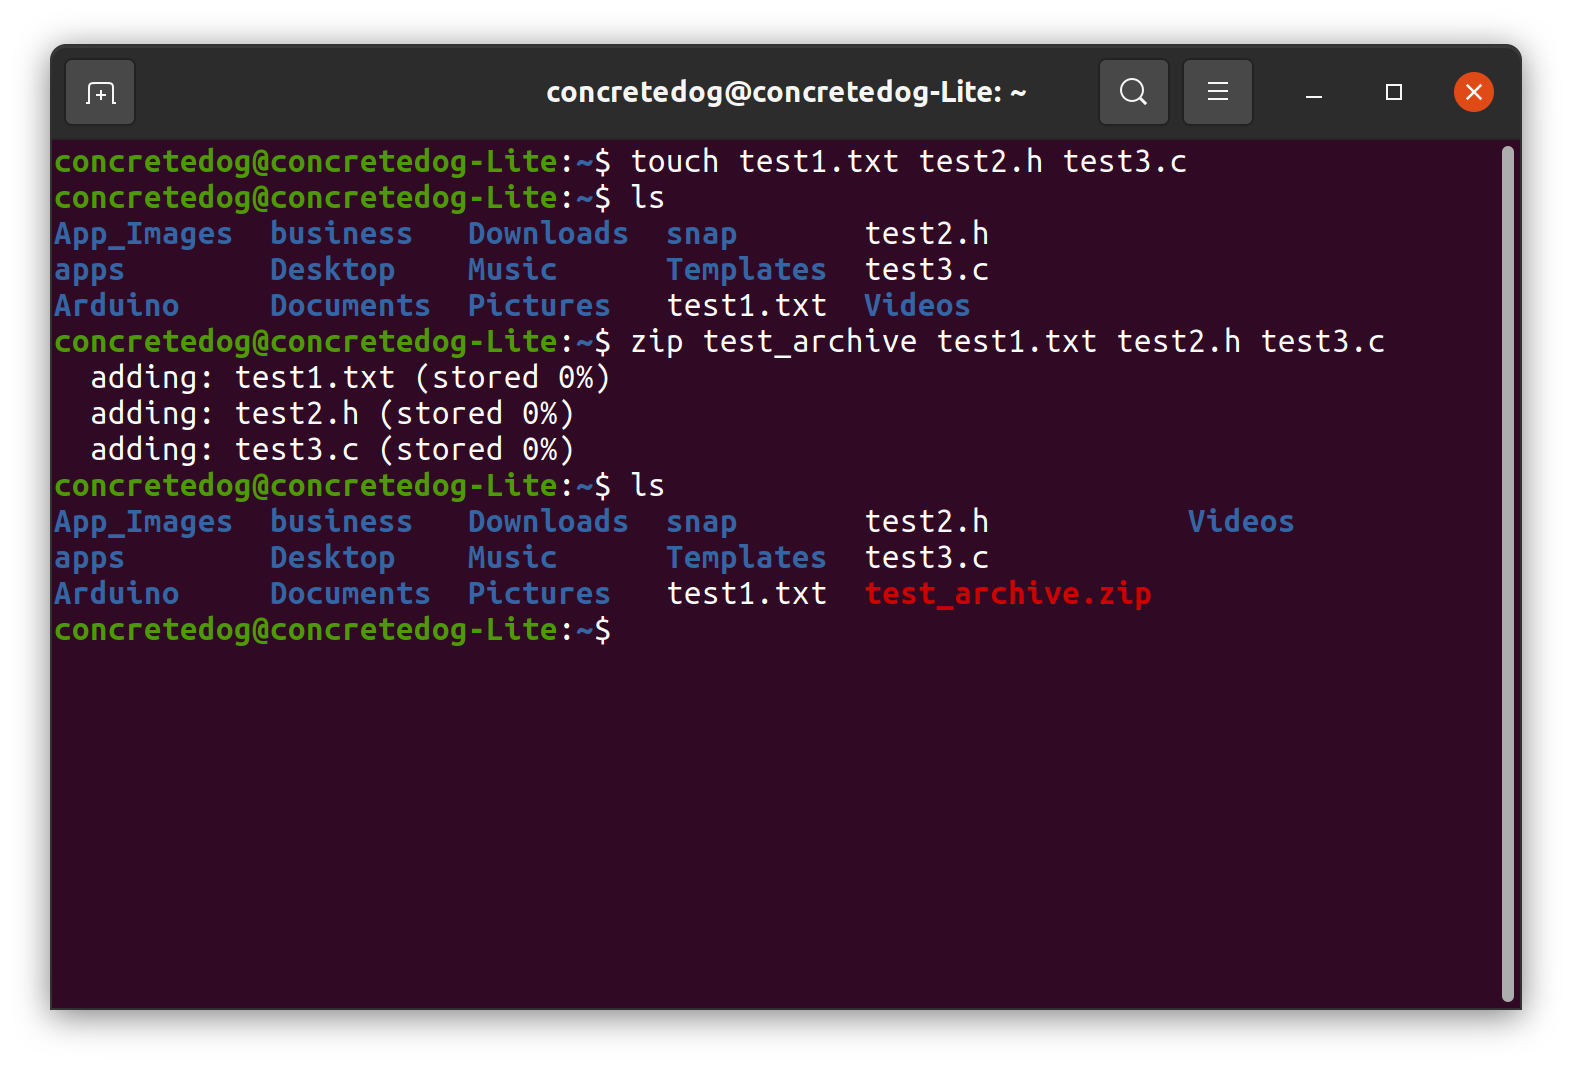
2.Create some test filesto add to our archive. Note the 3 different file suffixes.
3.List the filesto check that they have been created correctly.
Get Tom’s Hardware’s best news and in-depth reviews, straight to your inbox.
4.Using thezipcommand, create a ZIP archiveof the newly created files. To create a ZIP archive, we simply use the commandzipfollowed by the name we are giving the archive and then a list of the files we wish to include in the archive. The following command will create a ZIP archive calledtest_archive.zipand the archive will include the three test files. Note that we don’t need to add the archive suffix.zipto the name of the archive when using thezipcommand.
Creating a ZIP Archive Selecting Only Specific File Types
It’s possible to supply thezipcommand with arguments that only add specific file types to the archive. This is a powerful feature that is efficiently achieved on the command line.
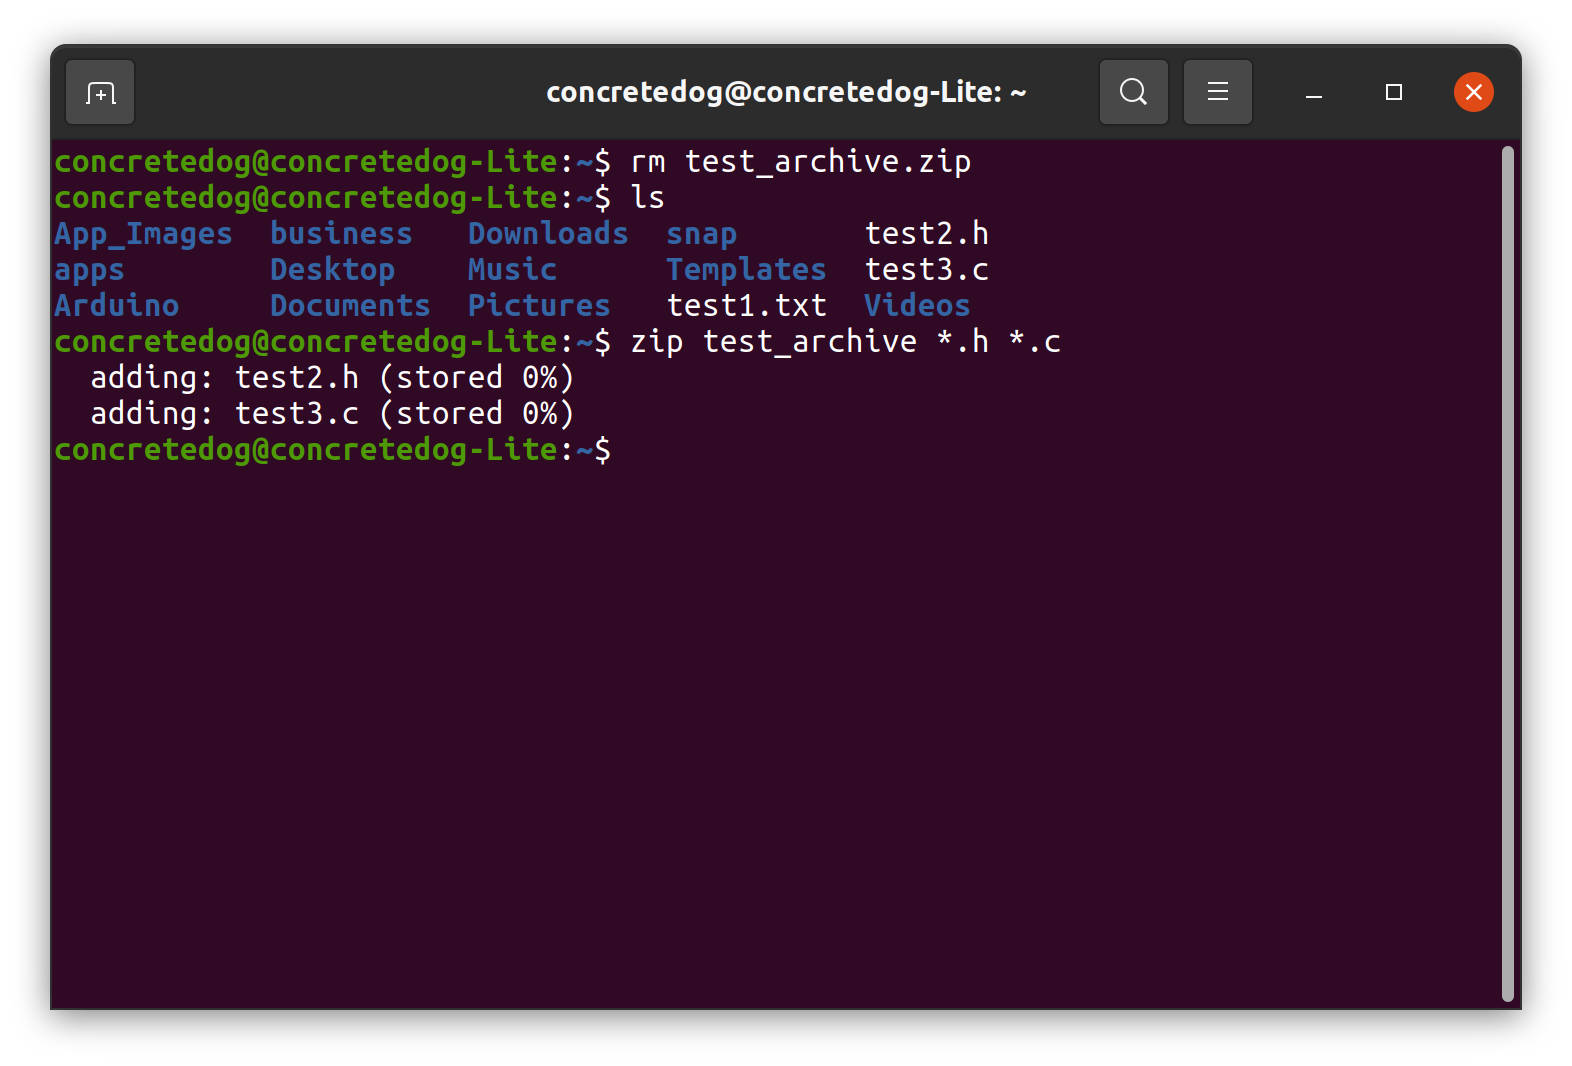
1.Delete any previous test archivesandcheck you still have the original three test files.Note that, unlike when creating the ZIP archive, you have to include the .zip file extension when referencing an existing archive.
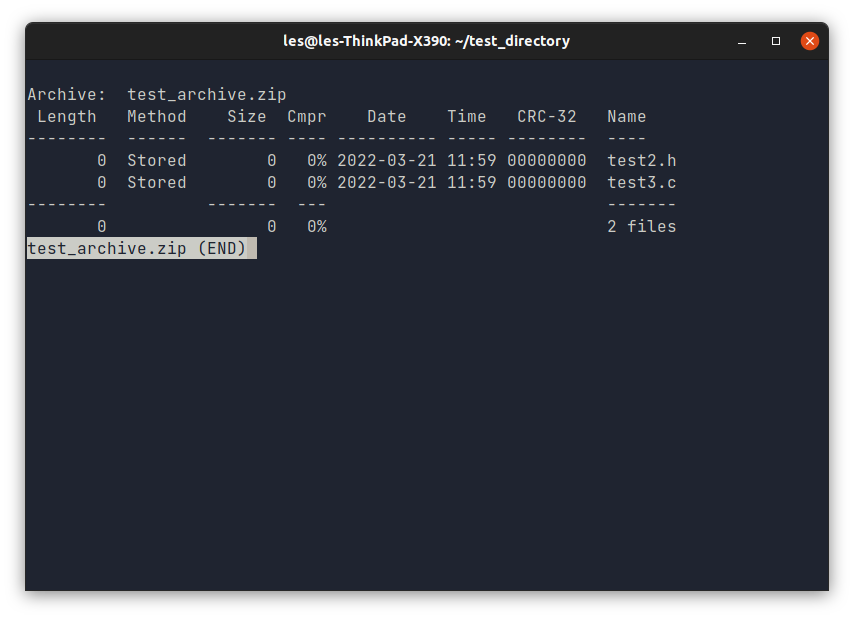
2.Create a new ZIP archive which contains only the test files ending.hand.c .After creating the archive, if you check its contents it will only contain the filestest2.handtest3.cand won’t containtest1.txt.
Create a ZIP archive Which Contains a Directory
Often we need to make a ZIP archive containing directories which contain files, we can do this by adding the recursive argument-rto thezipcommand.
1.Delete the archives inside the test_directory but keep the other files.To avoid confusion it would be good practice to delete the archives leaving only the original files that we created.
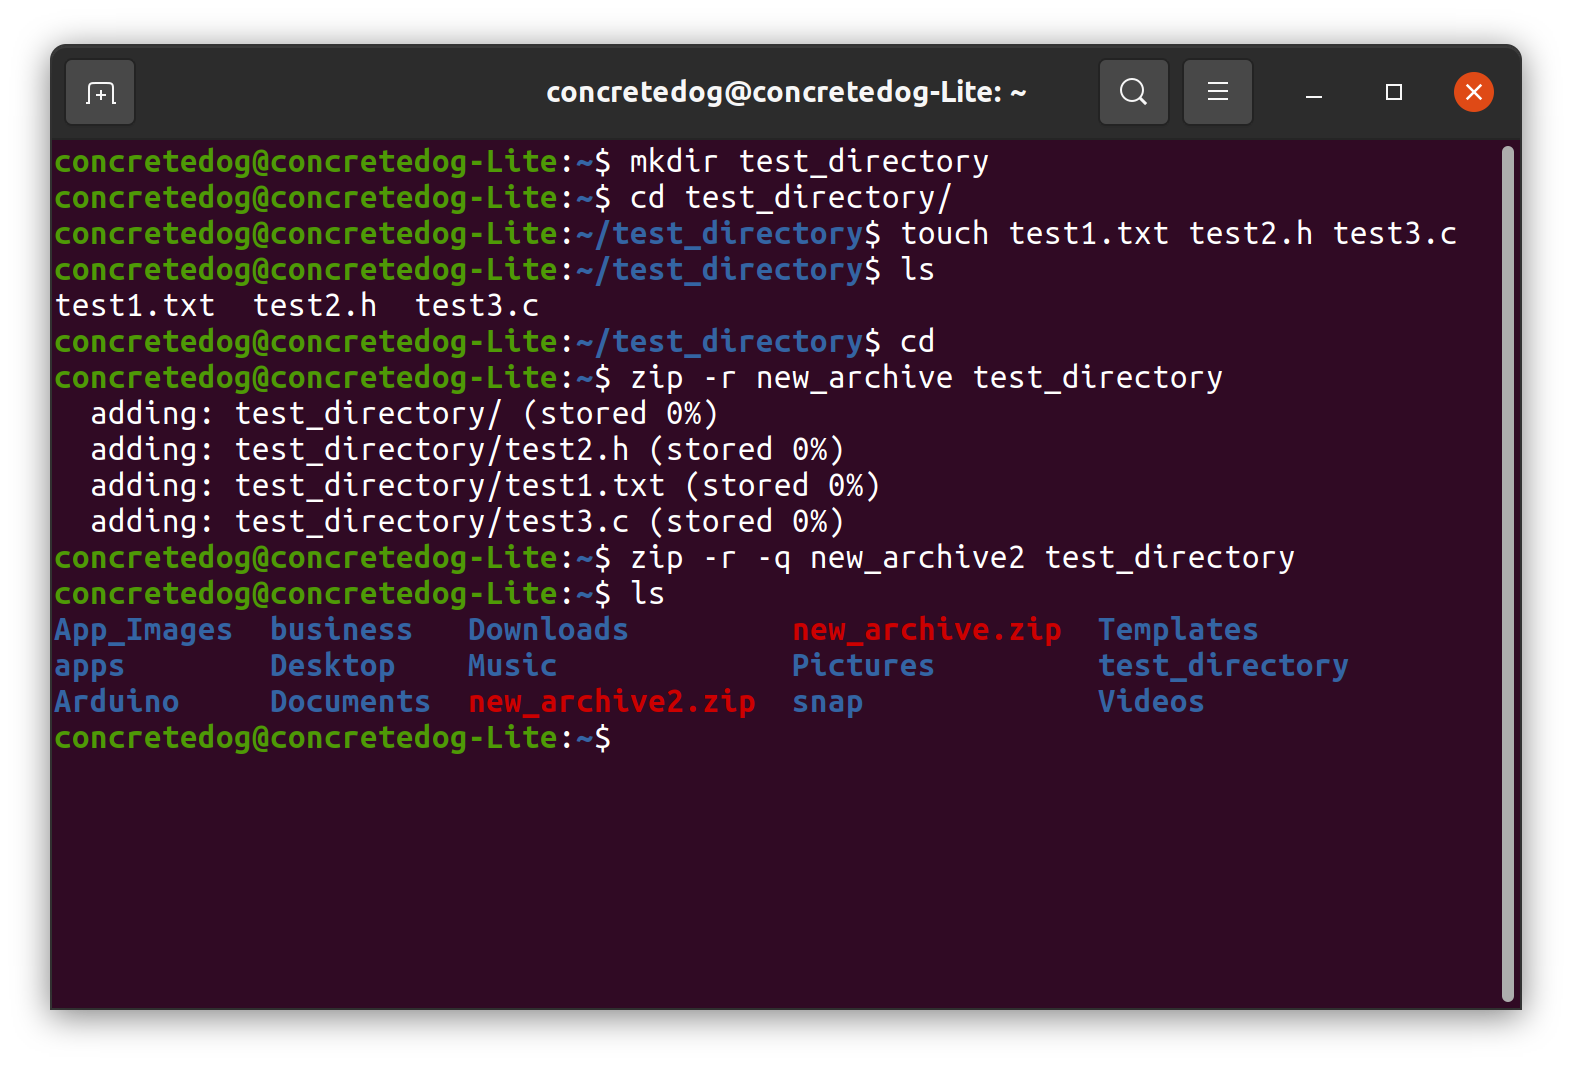
2.Go up one directory and check that you are not inside the directory to archive.We can’t be inside the directory that we wish to add to the archive.
3.Create a ZIP archive containing thetest_directorydirectory and its contents.Notice when you create the archive using the-rargument that you see a verbose output detailing each stage of the command as it descends into the directory and archives the files and folder.
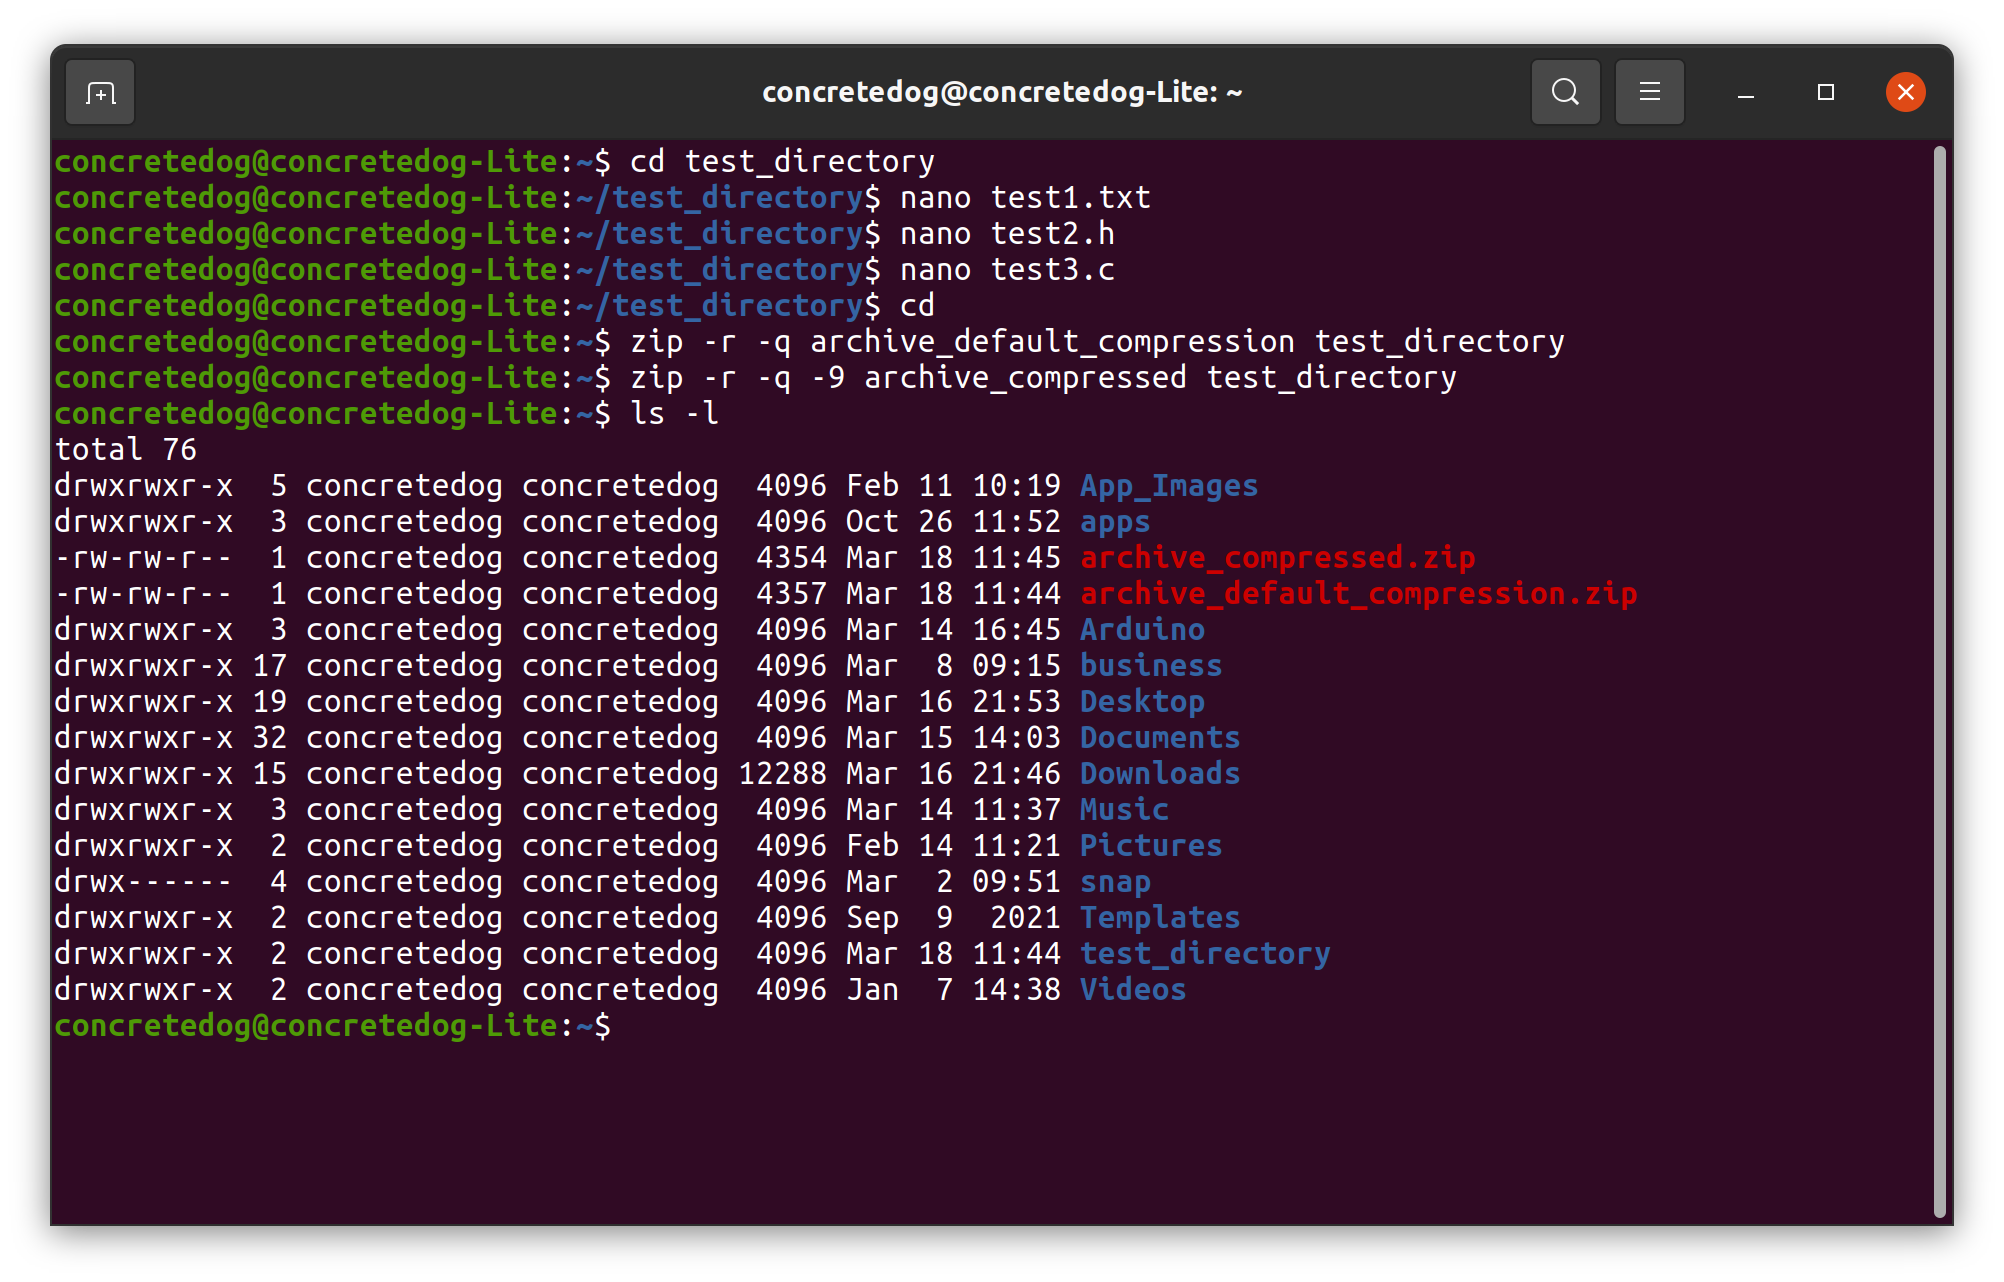
4.Make another similar ZIP archive using the-q(quiet) argument to disable the verbose output.You should see that this time that no steps are reported to the terminal in the creation of this archive. Then uselsto check the new archive has been created.
Change the Level of Data Compression for a ZIP Archive
By default, thezipcommand uses a compression value of 6 taken from a range of 0-9 with 0 being uncompressed and 9 being the maximum allowable level of compression. We can simply add a numerical argument to change the level of compression.
1.Add random data to the test files.Right now our test files test1.txt, test2.h and test3.c are empty. They have zero bytes of data but we can add random “garbage data” to the files using a quick terminal command that will dump 64MB into each file.
2.Return to the parent directory and create a new ZIP archive with the default compression level of 6.
3.Create another archive with the same contents but increase the compression level to 9.Check the details of the new archive and the previous archive usingls -l ,you should see that the size of the new archive is smaller than the previous archive as the data compression has been increased.
Extracting Zip Archives
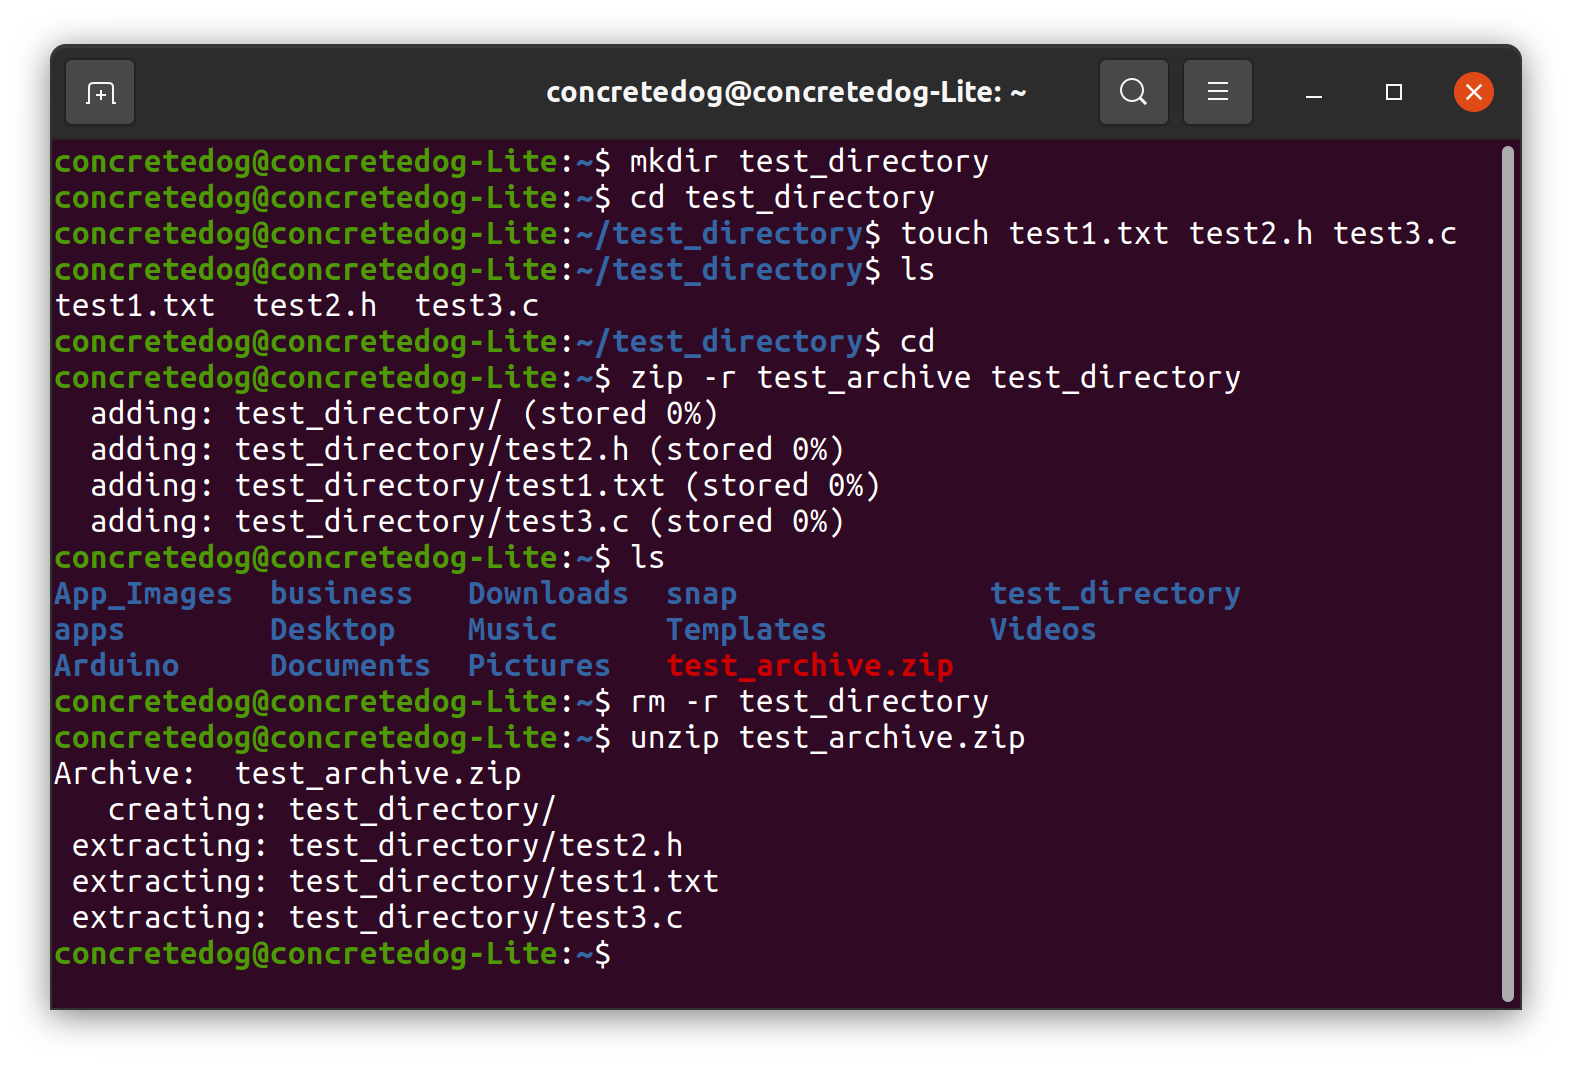
We will create a ZIP archive calledtest_archive.zipwhich contains a directorytest_directorywhich in turn contains 3 empty test files,test1.txt, test2.h, test3.c. To extract this archive we will use theunzipcommand.
1.Create a test folder containing the test files.After creating the test directory and files check the files have been created usinglsbefore returning to the parent directory.

2.Create a ZIP archive calledtest_archive.zipthat contains thetest_directory.Check that the archive has been successfully created usingls.Thezipcommand has two arguments, the name of the archive that we wish to create, and the source of the files to be put into the archive.
3.Delete the un-archived directory.If we extract thetest_archive.zipin the parent directory which contains thetest_directorywe would be asked if we want to replace or rename the archive.
4.Unzip thetest_archive.zipfile.Usingunzipwith no extra arguments we see a verbose output report of each step of extracting the archive.
Extracting a ZIP Archive to a Specified Location
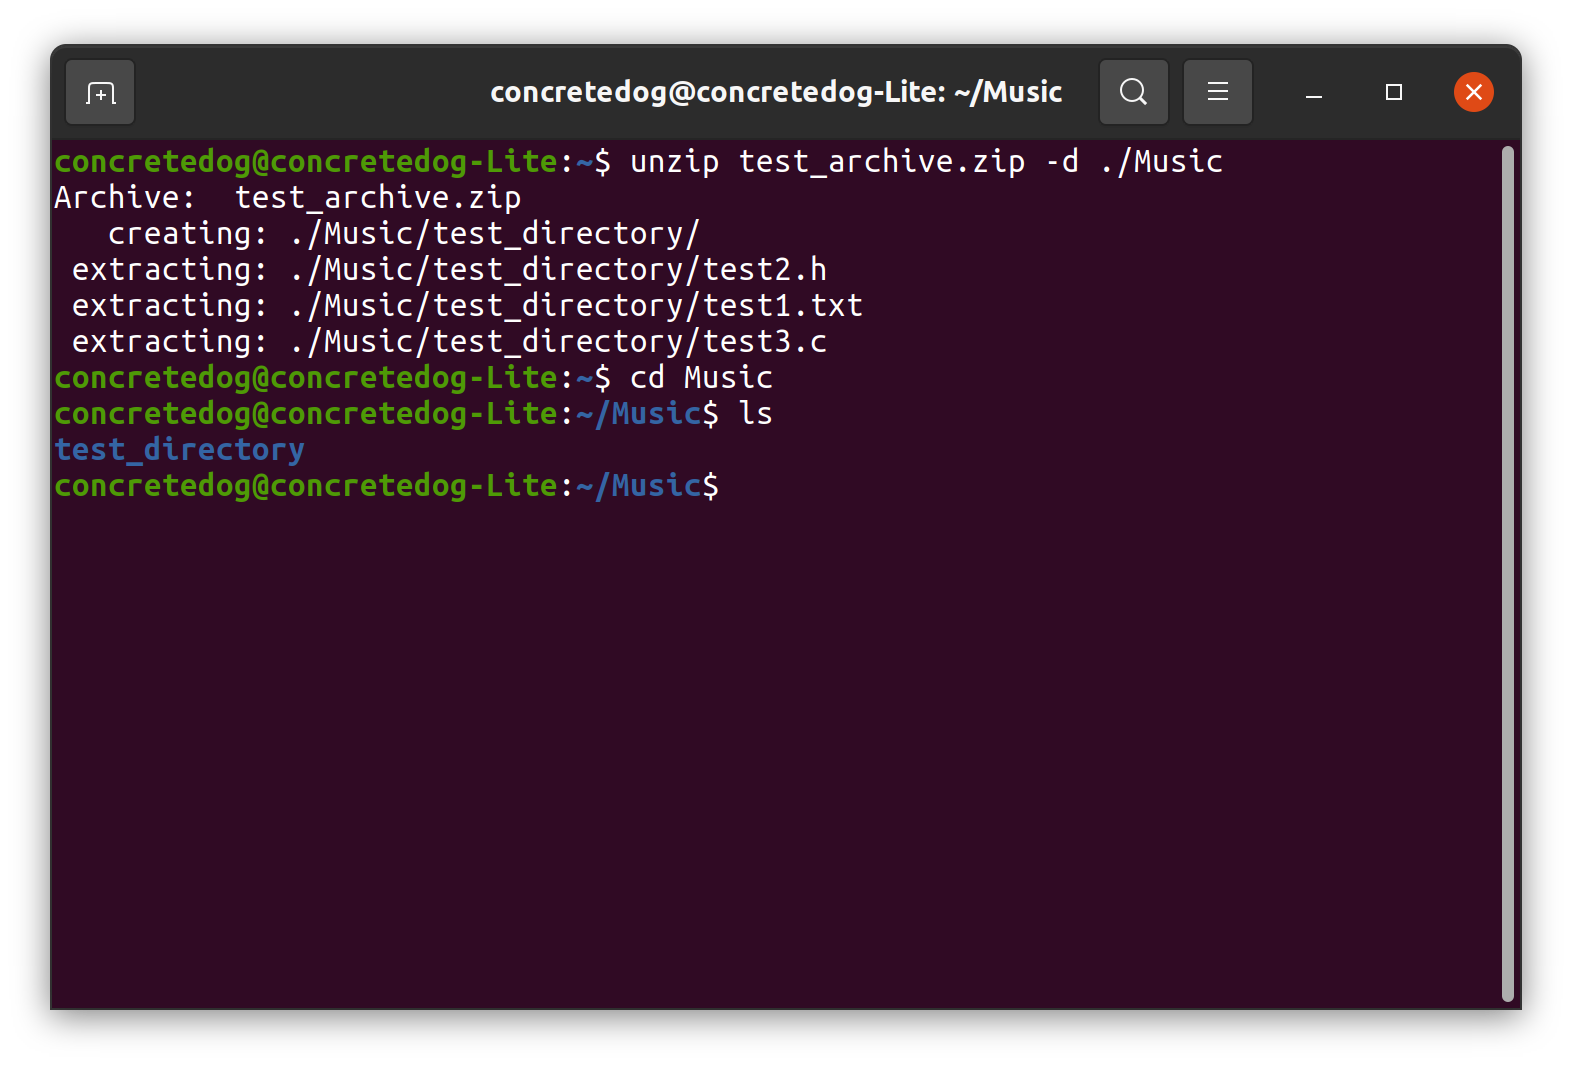
Often we will want to extract an archive into a different specified location. We can add the-dargument to theunzipcommand to achieve this.
1.Extract thetest_archive.zipto a specified directory.We can specify a relative or absolute location. In this example we extract the contents to the Music directory using a relative path. We could also pass an absolute path which provides the full path to the target location.After extracting the archive, move into the specified directory and uselsto check the archive has been extracted.
2.Change directory and list the contents to verify the files have been extracted correctly.
With these few basic uses of thezipcommand you now have lots of options when creating ZIP archives in the linux terminal. Being able to select specific file types and being able to set the compression level in the terminal emulator gives quick access to these powerful tools that are often hard to find in a GUI application.
Jo Hinchliffe is a UK-based freelance writer for Tom’s Hardware US. His writing is focused on tutorials for the Linux command line.