ASUS includes the IGFX/iGPU Multi-Monitor feature that lets you utilize the onboard video ports even when using a discrete GPU. However, there are times it may conflict with some games and you rather want to have it disabled.
To manage integrated graphics settings, access your ASUS BIOS and navigate toNB/SA Configuration(depending on the AMD/Intel motherboard). Here, you should find theIGFX/iGPU Multi-Monitoroption along with its related settings.
In my case, some games were utilizing integrated graphics even when I had installed a high-end graphics card. A simple and working solution was todisable the integrated graphics.
Whether you want to enable or disable the iGPU feature, this article should guide you through the necessary steps.
Check Processor Graphics Capability
Not all processors come with integrated graphics support. For that reason, it’s essential to first confirm whether your CPU is equipped with one.
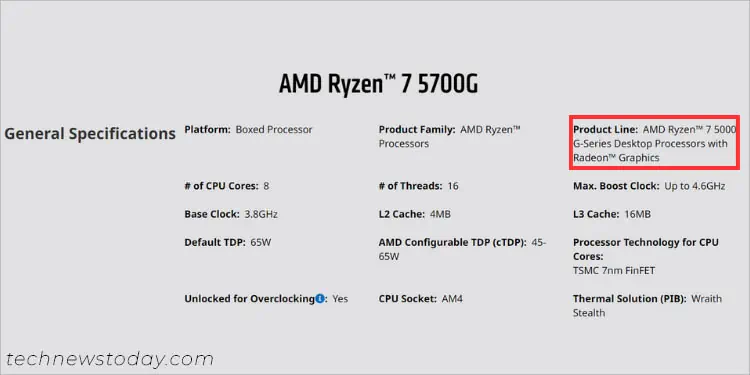
AMD Ryzen‘G’and the professional6000/7000 series(‘PRO’ in the model) come withRadeon graphics. These arereferred to as APUs. On the other hand, those withno suffixorXin their names do not support integrated graphics.

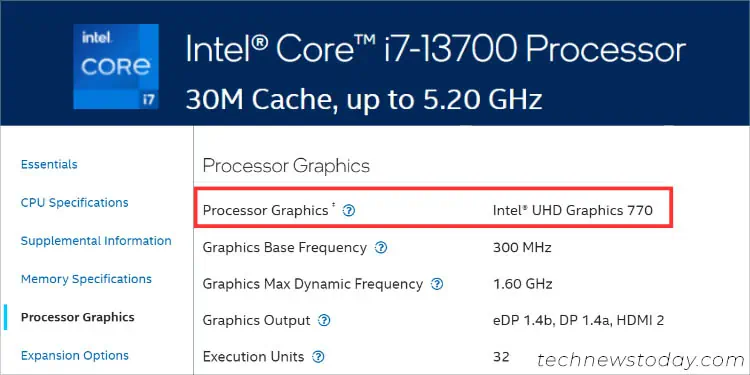
While Intel Core processors are well known for theirHD, UHD, and Iris Pro graphics, there are still a few exceptions. Those fromthe X-series(example, i9-10900X) and with the‘F’ suffix(example, i7-13700F) do not offer iGPU.
To manually verify whether your processor supports integrated graphics, you can check its specifications page online (just like I have done in the above image).
Access ASUS BIOS Settings Page
Once you have verified integrated graphics compatibility, let’s begin byaccessing the BIOS screen. But before that, ensure your primarymonitor isconnected to the dedicated GPU port.
Now, start your computer and wait until theASUS/TUF/ROG logoappears on the screen. Press theF2 or Del keyand you should get into the BIOS settings page immediately.
In case you didn’t get the “Please press Del or F2 to enter UEFI BIOS setting” message screen, it’s probably becauseFast Boot is enabled. In such a case, it’s best tospam the dedicated keyas soon as you press the power button.
If you’re already on the login screen, press the power icon from the bottom-right section.Hold Shift and hit Restart.This should take you to the Advanced recovery environment, where you can select theUEFI Firmware Settingsoption.
Additional Tip:
TheiGPU/IGFX Multi-Monitoroption remains disabled (by default) even when you have notinstalled a discrete graphics card. So, you do not have to worry as configuring the option won’t result in display-related issues.
you may even connect multiple displays if your motherboard has enough video output ports to support them.
Tweak Integrated Graphics Settings
ASUS suggests disabling the iGPU feature as it can have negative graphics performance. Since you’re using a dedicated GPU, it’s already utilizing its own VRAM. So, turning it off will decrease the load on both your RAM and CPU.
However, there are times when you might want to make use of the onboard video ports to reduce the stress on your GPU. In fact, Intel iGPUs have now become even more powerfulin terms of video encoding and decoding, and you definitely wouldn’t want to let it go to waste.
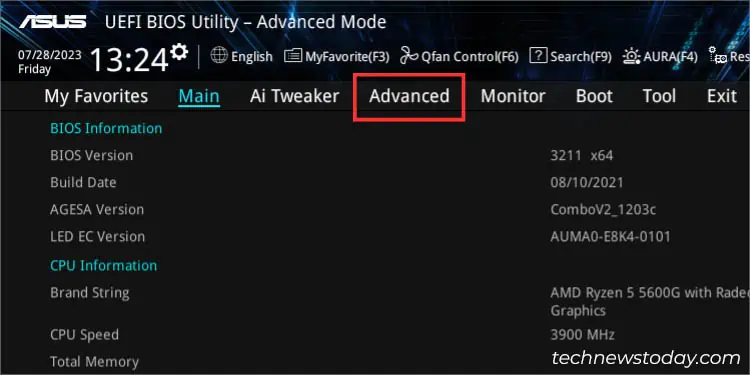
After accessing BIOS, quickly switch toAdvanced Mode(if you’re in theEZ Mode) using theF7 shortcut key.
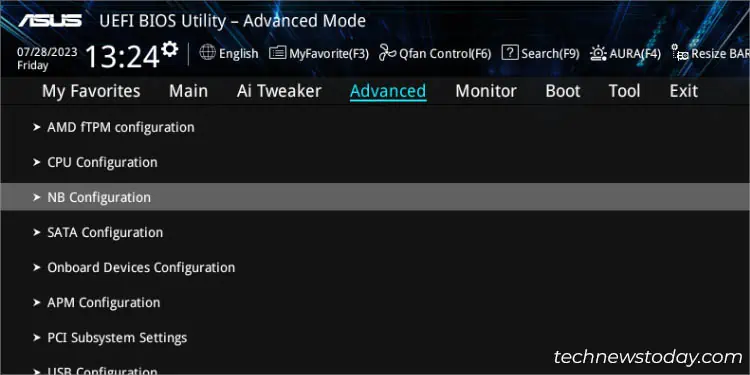
While the motherboard’s Integrated Graphics and its related settings are always located in the Advanced tab, the terminologies vary slightly on AMD and Intel. In the former, you should findIGFX Multi-Monitorwhile the latter should include theGPU or CPU Graphics Multi-Monitoroption.
On AMD Motherboards
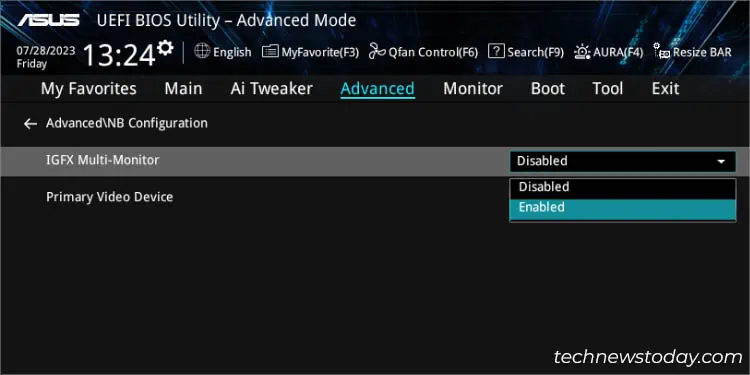
If you have an AMD APU, you’re likely going to find theIGFX Multi-Monitoroption within theNB Configuration. Follow the below instructions to enable it:
Note:Some ASUS AMD BIOS also offerHybridmode in addition to Enabled and Disabled. While enabling the option allows you to use both the integrated and dedicated GPU ports simultaneously, choosing Hybrid will dynamically switch between the two.
On Intel Motherboards
The only difference in the Intel ASUS BIOS is that they includeSA Configurationinstead ofNB configuration. Also, you need to enter theGraphics Configurationsection before configuring the feature:
Note:Some ASUS Intel BIOS will haveCPU Graphics Multi-Monitoroption instead ofiGPU Multi-Monitor. Both mean the same thing.
Configure Additional iGPU/IGFX Settings
Along with theiGPU/IGFX Multi-Monitoroption, you can also manage some optional settings based on your needs. These include picking the primary video device, allocating shared memory size, and power-saving configuration.
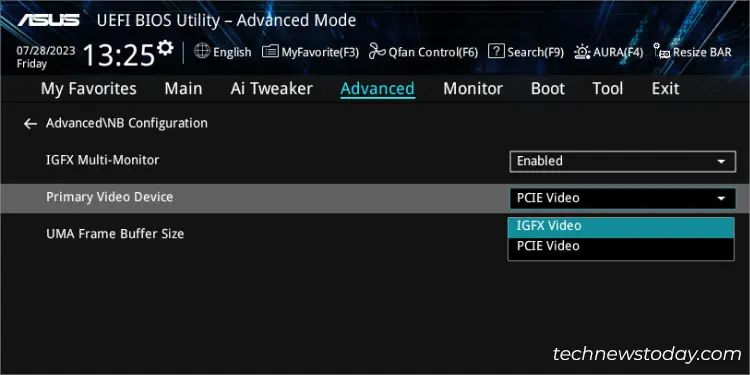
Select Primary Video Device
The first option involves setting the primary display device for your BIOS. This means that only the selected display is used when you’re accessing the ASUSUEFI Utility.
In AMD, you can chooseIGFX Video or PCIE Videofrom thePrimary Video Devicefield. On the other hand, you need to setCPU GraphicsorPCIE/PEGfrom thePrimary Displayoption in Intel ASUS motherboards.
Personally, I like to set it toAutoas this allows the ASUS motherboard to automatically select the best option.
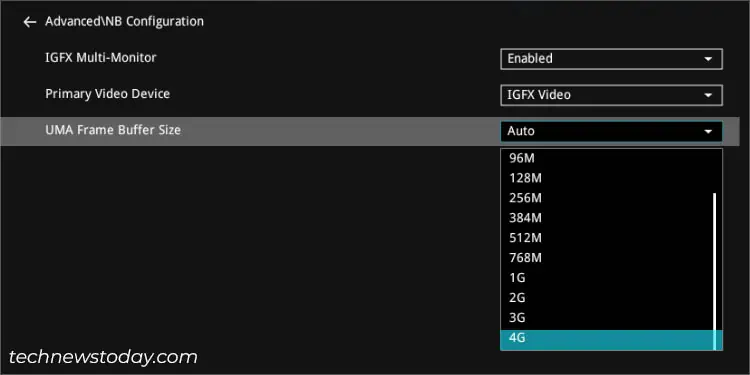
Allocate Memory to Integrated Graphics
The integrated graphicsrequires some amount of system memory(which can be allocated from your current RAM) for processing or rendering graphics. You can manage this option from theUMA Frame Buffer Sizefield in AMD andDVMT Pre-Allocatedin Intel BIOS.
You may skip the option if the primary device is set toPCIE videoas it already has its own dedicated VRAM.
While I like to set theUMA Frame Buffer SizetoAuto, it’s also possible to allocate a manual size from the list. When doing so, make sure you choose one based on yourRAM capacity.
As with AMD boards, you can reserve a specific amount of system memory for Intel’s integrated graphics. Just expand theDVMT Pre-Allocatedfield and select one from the list.
Manage iGPU Power Consumption
Some Intel boards also supportRC6 (Render Standby), a power-saving feature that sends the integrated graphics to a low power consumption state whenever idle.
Enabling this option decreases the CPU’s power consumption andprevents it from overheatingunnecessarily.
Save Changes and Verify
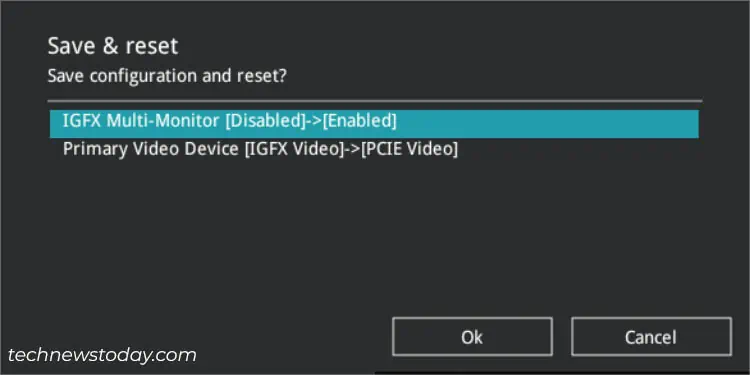
After configuring all the desired options, don’t forget to save the changes. You can do this fromExit>Save Changesand Resetor directly press theF10 key.
Once theSave & resetdialogue box pops up, hit Ok and you’llexit from the BIOS mode. Now, wait for your computer to reboot.
Finally, you may proceed to connect your additional monitor(s) to the motherboard’s video output port(s) and you should get the display. But do note that when accessing ASUS UEFI/BIOS, only the selected primary video device will show the content.
