UEFI is a firmware that controls every component connected to your computer. You can enable/disable the entire hardware components and even overclock a few of them through UEFI.
However, accessing and using the UEFI firmware can be a little tricky—especially if you have just gotten into tweaking hardware settings. In fact, not every motherboard has UEFI firmware settings enabled as default—old motherboards run in classic BIOS mode or Legacy mode.
Below, we have discussed a few ways you can access and use the UEFI settings.
How to Access UEFI Firmware Settings?
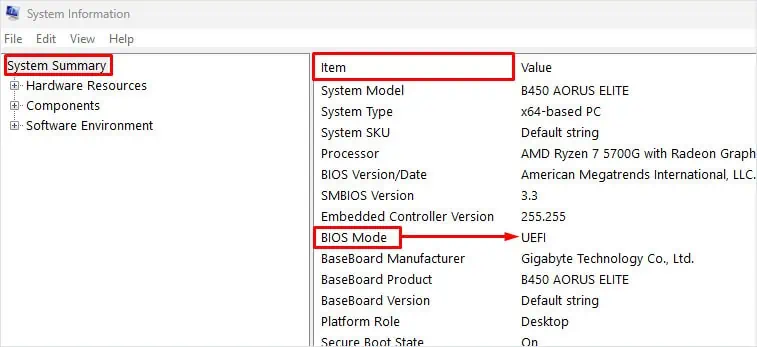
Your motherboard’s BIOS operates in two different modes, UEFI and Legacy or CSM (Compatibility Support Module). If the BIOS is in Legacy or CSM mode, you cannot access the settings and configuration available in UEFI.
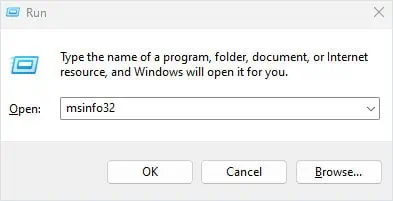
Here’s how you can use the system information to check your current BIOS mode.
After you have confirmed the BIOS mode on your system, you’re able to access UEFI firmware settings either through the advanced startup menu or by pressing the BIOS key.
Using BIOS Key
Using the BIOS to enter UEFI mode is probably the easiest compared to the advanced startup method.Turn on your PC and repeatedly press the BIOS key on your keyboardto enter the BIOS.
If you do not know the BIOS key for your system, you can check the motherboard or laptop user manual.
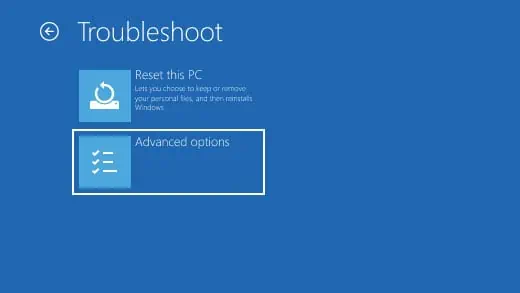
Advanced Startup
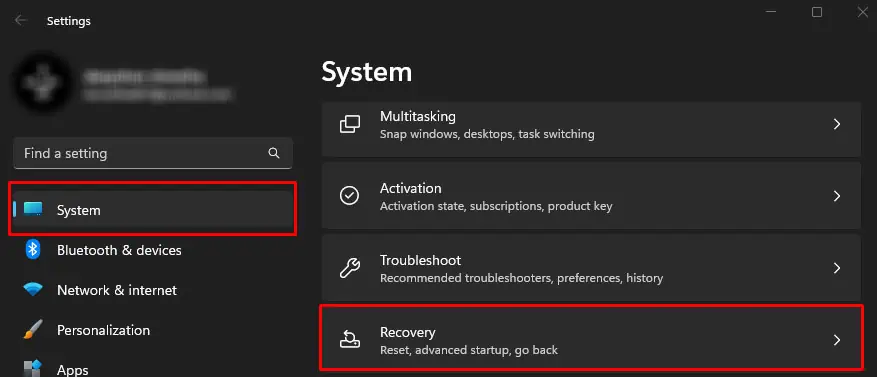
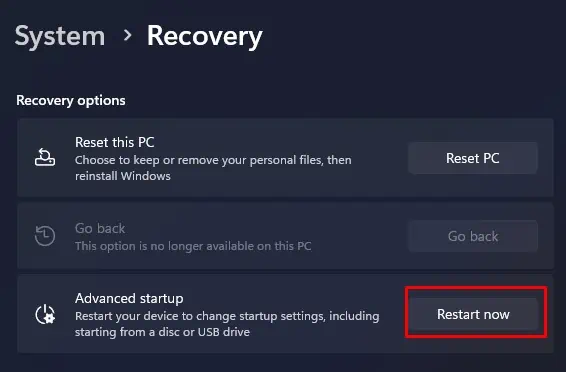
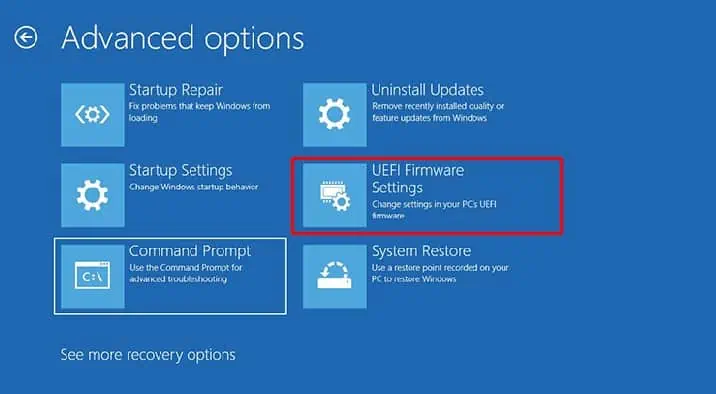
Windows users can easily enter the UEFI firmware settingsusing the Advanced Startup menu. The advanced startup menu allows you to access all the startup settings and UEFI firmware settings, uninstall updates, perform a startup repair and even restore the system.
Once the system restarts, it will directly load into the UEFI firmware settings.
Can’t Access UEFI Settings?
Most of the time, repeatedly pressing the BIOS key during boot or using advanced startup will most likely boot you into UEFI BIOS. However, if that does not work, settings in the BIOS itself could be causing the system from accessing UEFI settings.
For instance, if you have fast boot enabled, you may not be able to access the UEFI even when you repeatedly press the Delete key. In such a case, you need to disable fast boot.

Besides, you can try resetting the BIOS and check if you can access the UEFI settings. Resetting the BIOS will revert any changes made to the system, and set all its settings to the default state. There are several ways you can reset the BIOS. Since you cannot enter the BIOS, we recommendremoving the CMOS batteryto reset the BIOS.
You can also refer to this comprehensive guide if yourPC won’t boot into BIOS.
How to Use UEFI Settings?
Once you have access to UEFI settings, you can change settings related to every hardware component connected to your computer. If your motherboard and CPU support it, you can even boost your system performance by adjusting the right configurations. However, in this article, we have only discussed a few basic UEFI settings.
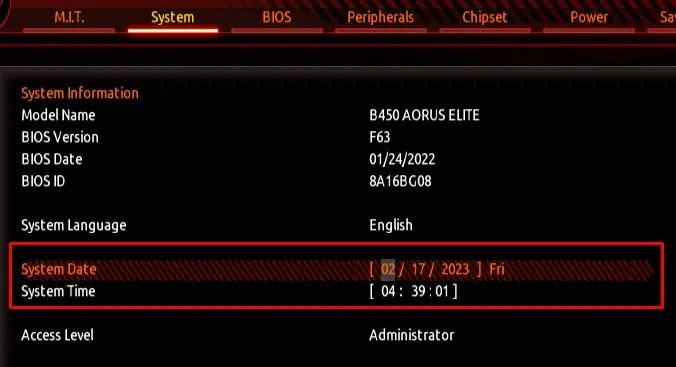
Set Motherboard Date and Time
Your motherboard keeps track of thecurrent date and timeso that the system has access to the correct time. Incorrect system time may stop some components from functioning.
Incorrect date and time mean the PC will run into problems when performing scheduled tasks, it will add an incorrect date and time stamp to a file, and some applications that require internet access may even run into authorization issues.
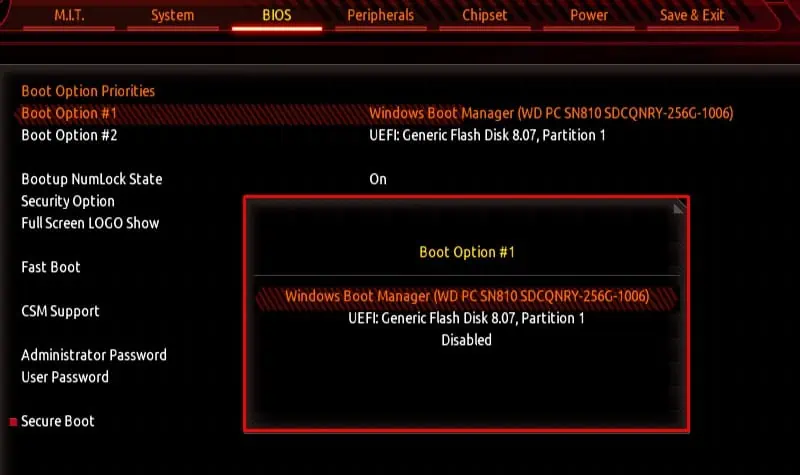
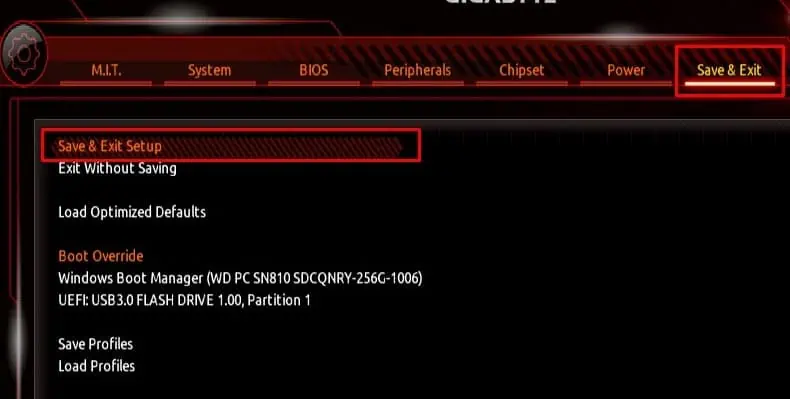
Set Boot Order
Another crucial UEFI setting is the Boot order. Theboot ordersets a list of storage devices that the UEFI BIOS searches for when loading the Operating system. If the BIOS cannot find the OS in any of the storage devices, you will run into a “Boot device not found” error.
Furthermore, if you are installing the OS using a USB flash drive, you need to set said USB drive to the top of the list.
Change BIOS Mode
If the BIOS is in CMS or Legacy mode, you cannot access some of the settings available on UEFI firmware. A particular setting that’s not available in Legacy BIOS is the option to access Secure Boot.
To change the BIOS mode to UEFI,
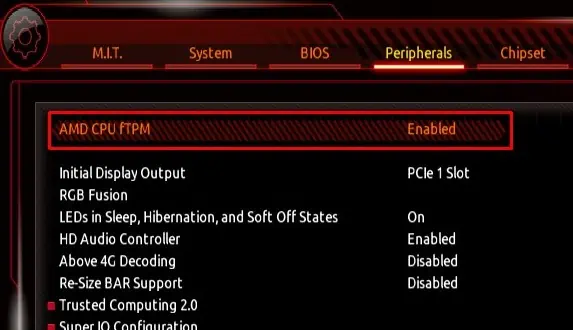
TPM and Secure Boot
TPM or the Trusted Platform Module adds a layer of hardware security to your system. It stores hardware encryption keys and digital certificates. Some Operating system also requires you toenable TPMfirst before installing them.
Besides TPM, Secure Boot is also another security feature that you can find on your motherboard’s UEFI which prevents malware from loading when the system boots. Like TPM, some OS also requires you toenable Secure Bootbefore installing it.

Control Fan Speed
UEFI also allows you to check your current fan speed. Besides this, you can evencontrol the CPU and system fan speedso that it does not reach extreme temperature.
The UEFI may also have a temperature-RPM graph that automatically changes the fan’s RPM (Rotations Per Minute) depending on the temperature.
In your motherboard’s UEFI, search for settings namedCooling,Hardware Monitor,Fan Info,Fan control, orSmart Fan.
Check PC Health
PC Health displays the current system status like CPU voltage. DRAM voltage, CPU temp, CPU fan speed, system temperature, supplied voltage, and optimal voltage. Using these readings, you can determine the PC is in good condition.
You can check your PC’s health inside settings namedPC health,System Health, orPC Health Status.
Overclock Settings
Not all motherboards support overclocking. But if both your motherboard and CPU support overclocking, you’re able to use the UEFI firmware settings to overclock your system.
When overclocking, you increase the clock speed and simultaneously increase its voltage. But when done to the extreme, it puts a lot of strain on the hardware. This might result in permanent damage to the overclocked component.
You can refer to this guide to get more information on safelyoverclocking your CPU.
