If you use Linux and Windows in your life, you’ll notice one huge point of frustration: Windows can’t read Linux partitions, which are typically in ext4 or ext3 file format. If you connect an external drive or microSD card that has a partition which is formatted in ext4 to your Windows PC, the OS won’t assign a drive letter to that partition or show you the files and folders.
The lack of ext4 / ext3 support is a particularly big problem forRaspberry Pifans. When you install Raspberry Pi OS on a microSD card or external SSD to use as your boot disk, the drive has two partitions: a small boot partition that’s FAT32 and therefore visible in windows and a larger partition that’s ext4 and contains all the data and apps.

So let’s say were setting up a retro gaming console on your Pi and wanted to copy a whole bunch of ROMS onto the ext4 partition. Or perhaps you are using a Raspberry Pi to power a web server or a media server and you want to copy all your files to the card from your Windows PC. You need a way to access Linux ext4 partitions from within Windows.
Unfortunately, neitherWindows 11nor 10 comes with a built-in way to access Linux partitions. There are some pricey or outdated third-party utilities for accessing ext4, but the best way is to use WSL (Windows Subsystem for Linux) ,Microsoft’s free Linux virtual machine. Once you have a WSL VM set up for this task, you can use it to mount USB devices such as microSD card readers, SSD enclosures and Flash Drives and those drives then appear in WIndows Explorer so you can treat them like any other drive.
Surprisingly, the process of setting up ext4 drive mounting for the first time is pretty intense. By default, WSL does not support mounting drives with Linux partitions so you need to go through a process of installing a free utility that runs in PowerShell, grabbing a bunch of packages in your Linux VM (usually Ubuntu) and compiling a custom version of the WSL Linux kernel that has USB Mass Storage drivers enabled. I learned all of the steps in this process by following along with thisgreat tutorial video from AgileDevArt(huge h/t to him).
Below, I’ll show you how to set up WSL so you can mount external drives and access Linux partitions from within Windows 11 or 10. It’s not difficult, but it does take a few steps.

What You Need: Accessing Linux Partitions in Windows
1.Download and install usbipd. you’re able to get thelatest release on Githubor type “winget install usbipd” from within PowerShell.
Get Tom’s Hardware’s best news and in-depth reviews, straight to your inbox.

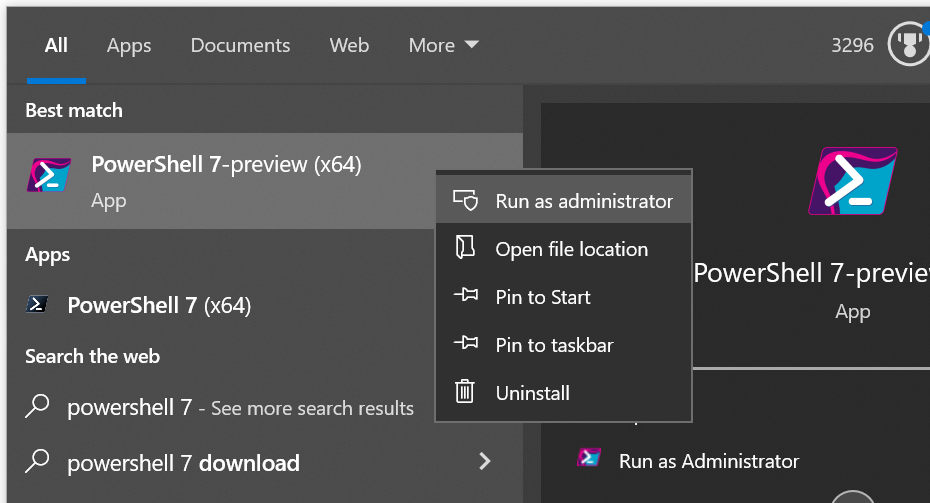
2.Launch Powershell 7as Administrator.
3.Update WSLto the latest Linux kernel by typingwsl –updatein PowerShell. If you already have the latest version, it will say so.
4.Launch Ubuntuin Windows.
5.Update and Upgrade your packageswith these commands. The -y switch will auto-accept the installation of any new packages.
6.Enteruname -ato determine what version of the Linux kernel you have. Take note of the exact version number. In our case, that was 5.15.153.1.

7.Assign the version number to an environment variablecalled VER.
8.Install some required packageswith this command. The -y switch will auto-accept the installation of the required packages.
9.Clone the kernel source from Githuband change into its directory with the following command.
Note that the kernel source will take several minutes to download. When it is done, you will be in the new directory it created (ex: 5.15.153.1-microsoft-standard).
10.Copy the config.gz file to the current directory and unzip it to filename .config.
11.Entersudo make menuconfigto open the modules menu.
You will now see a GUI menu. We recommend stretching your Ubuntu window out so you can see more of it.
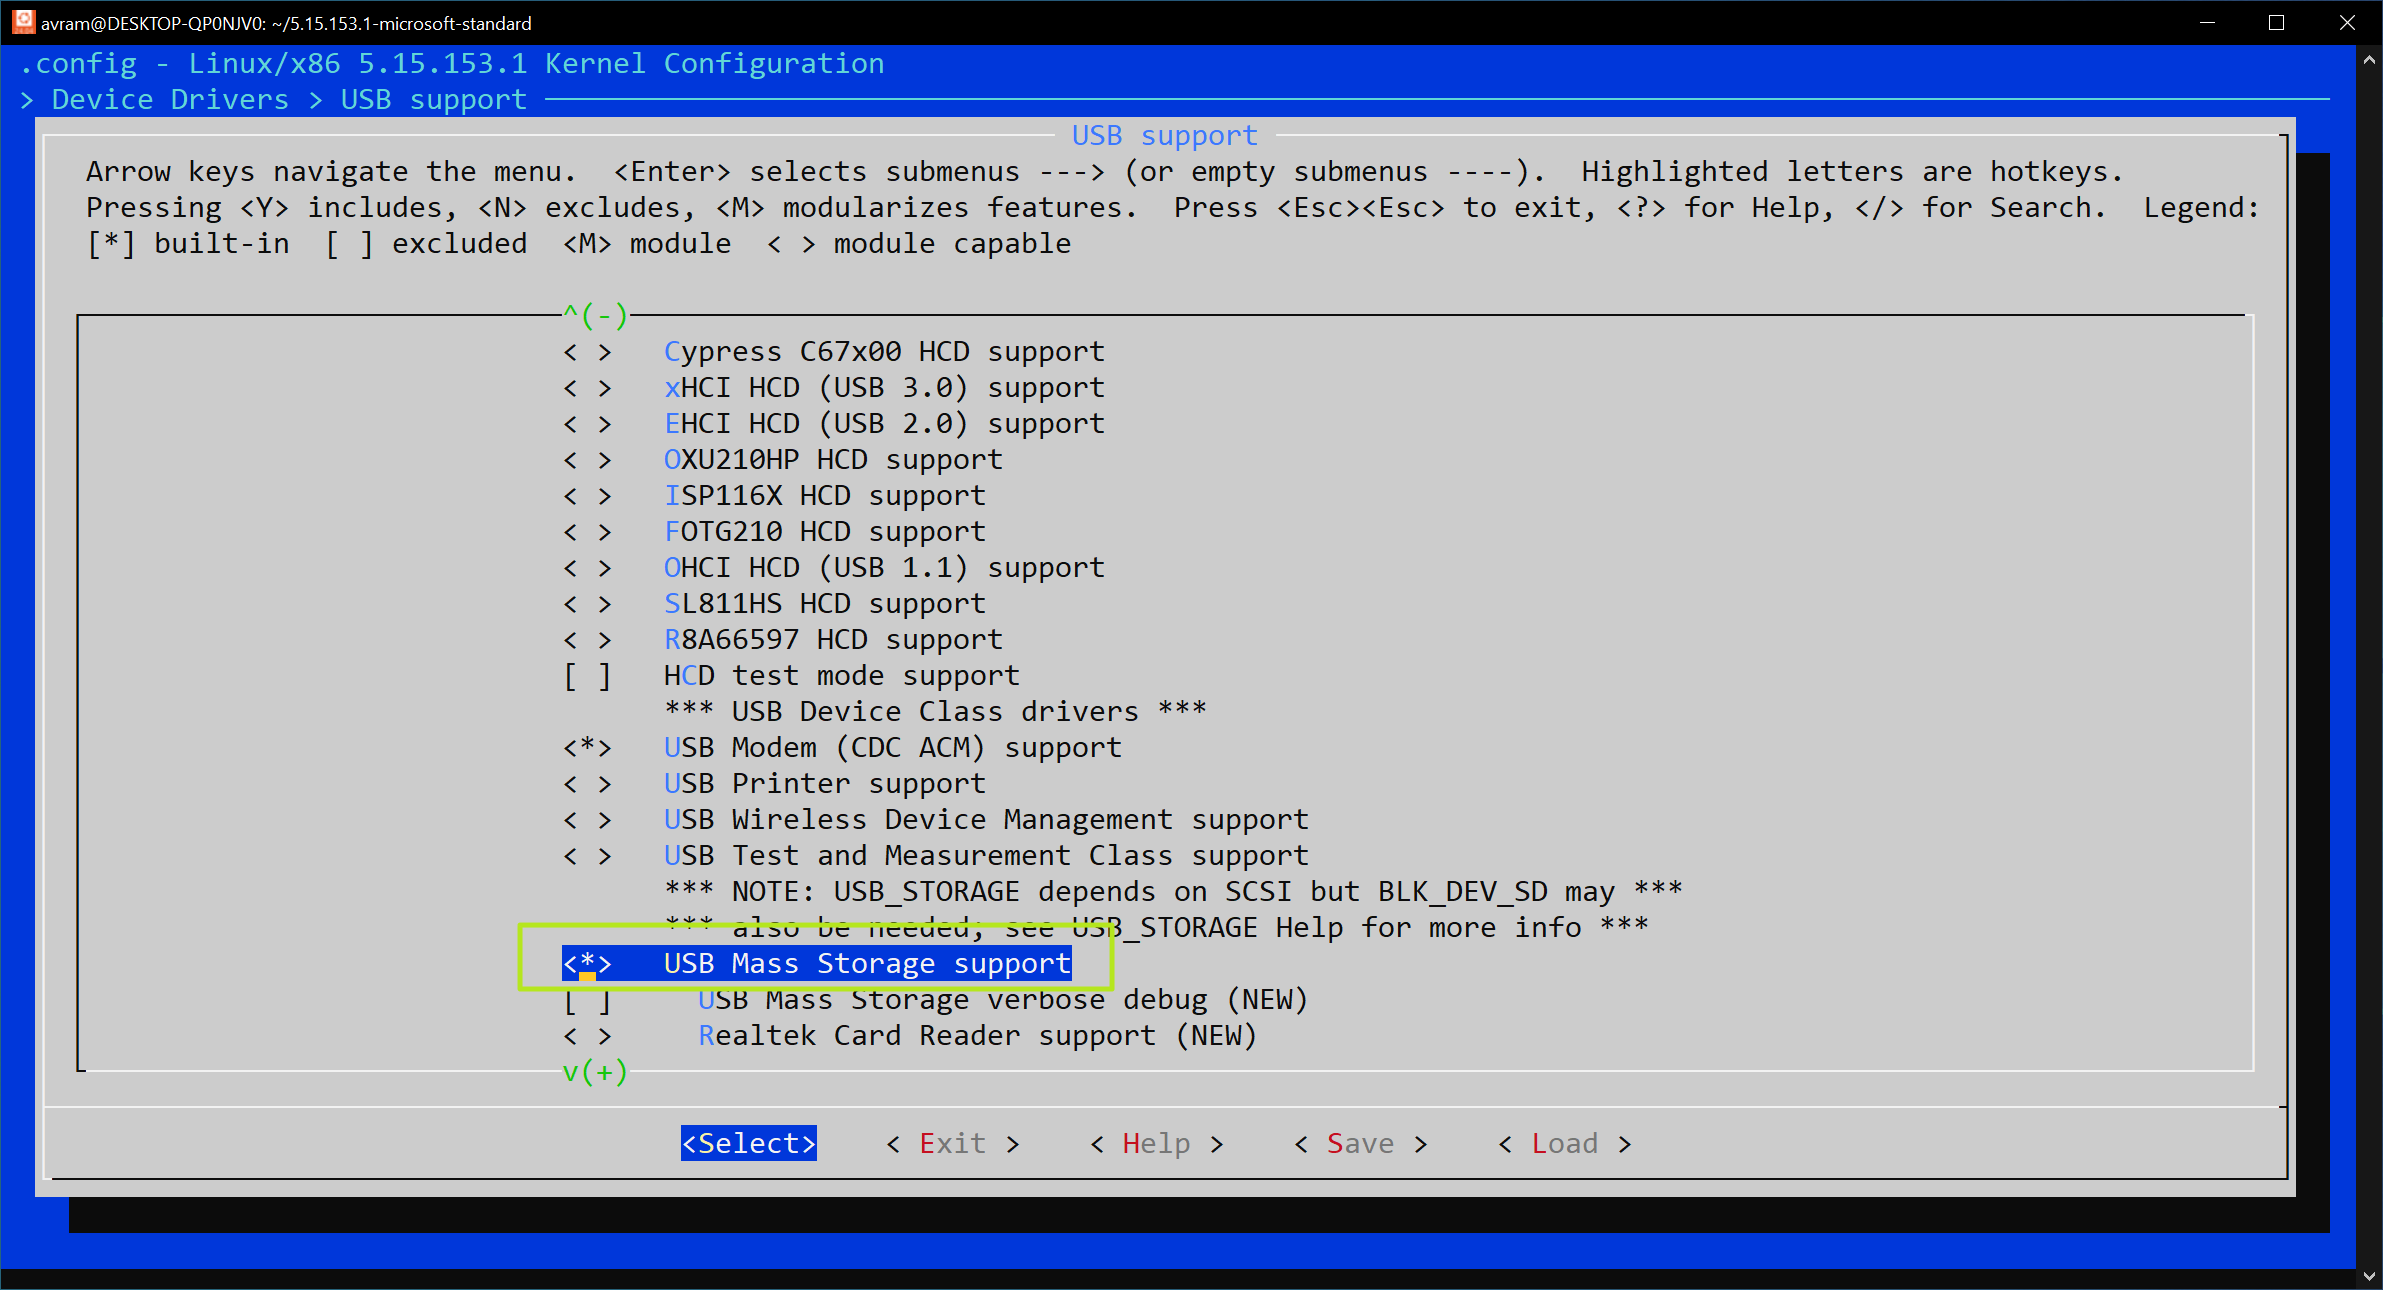
12.Navigate to Device Drivers -> USB support
13.Select USB Mass Storage Supportandhit Yto put an * next to it.
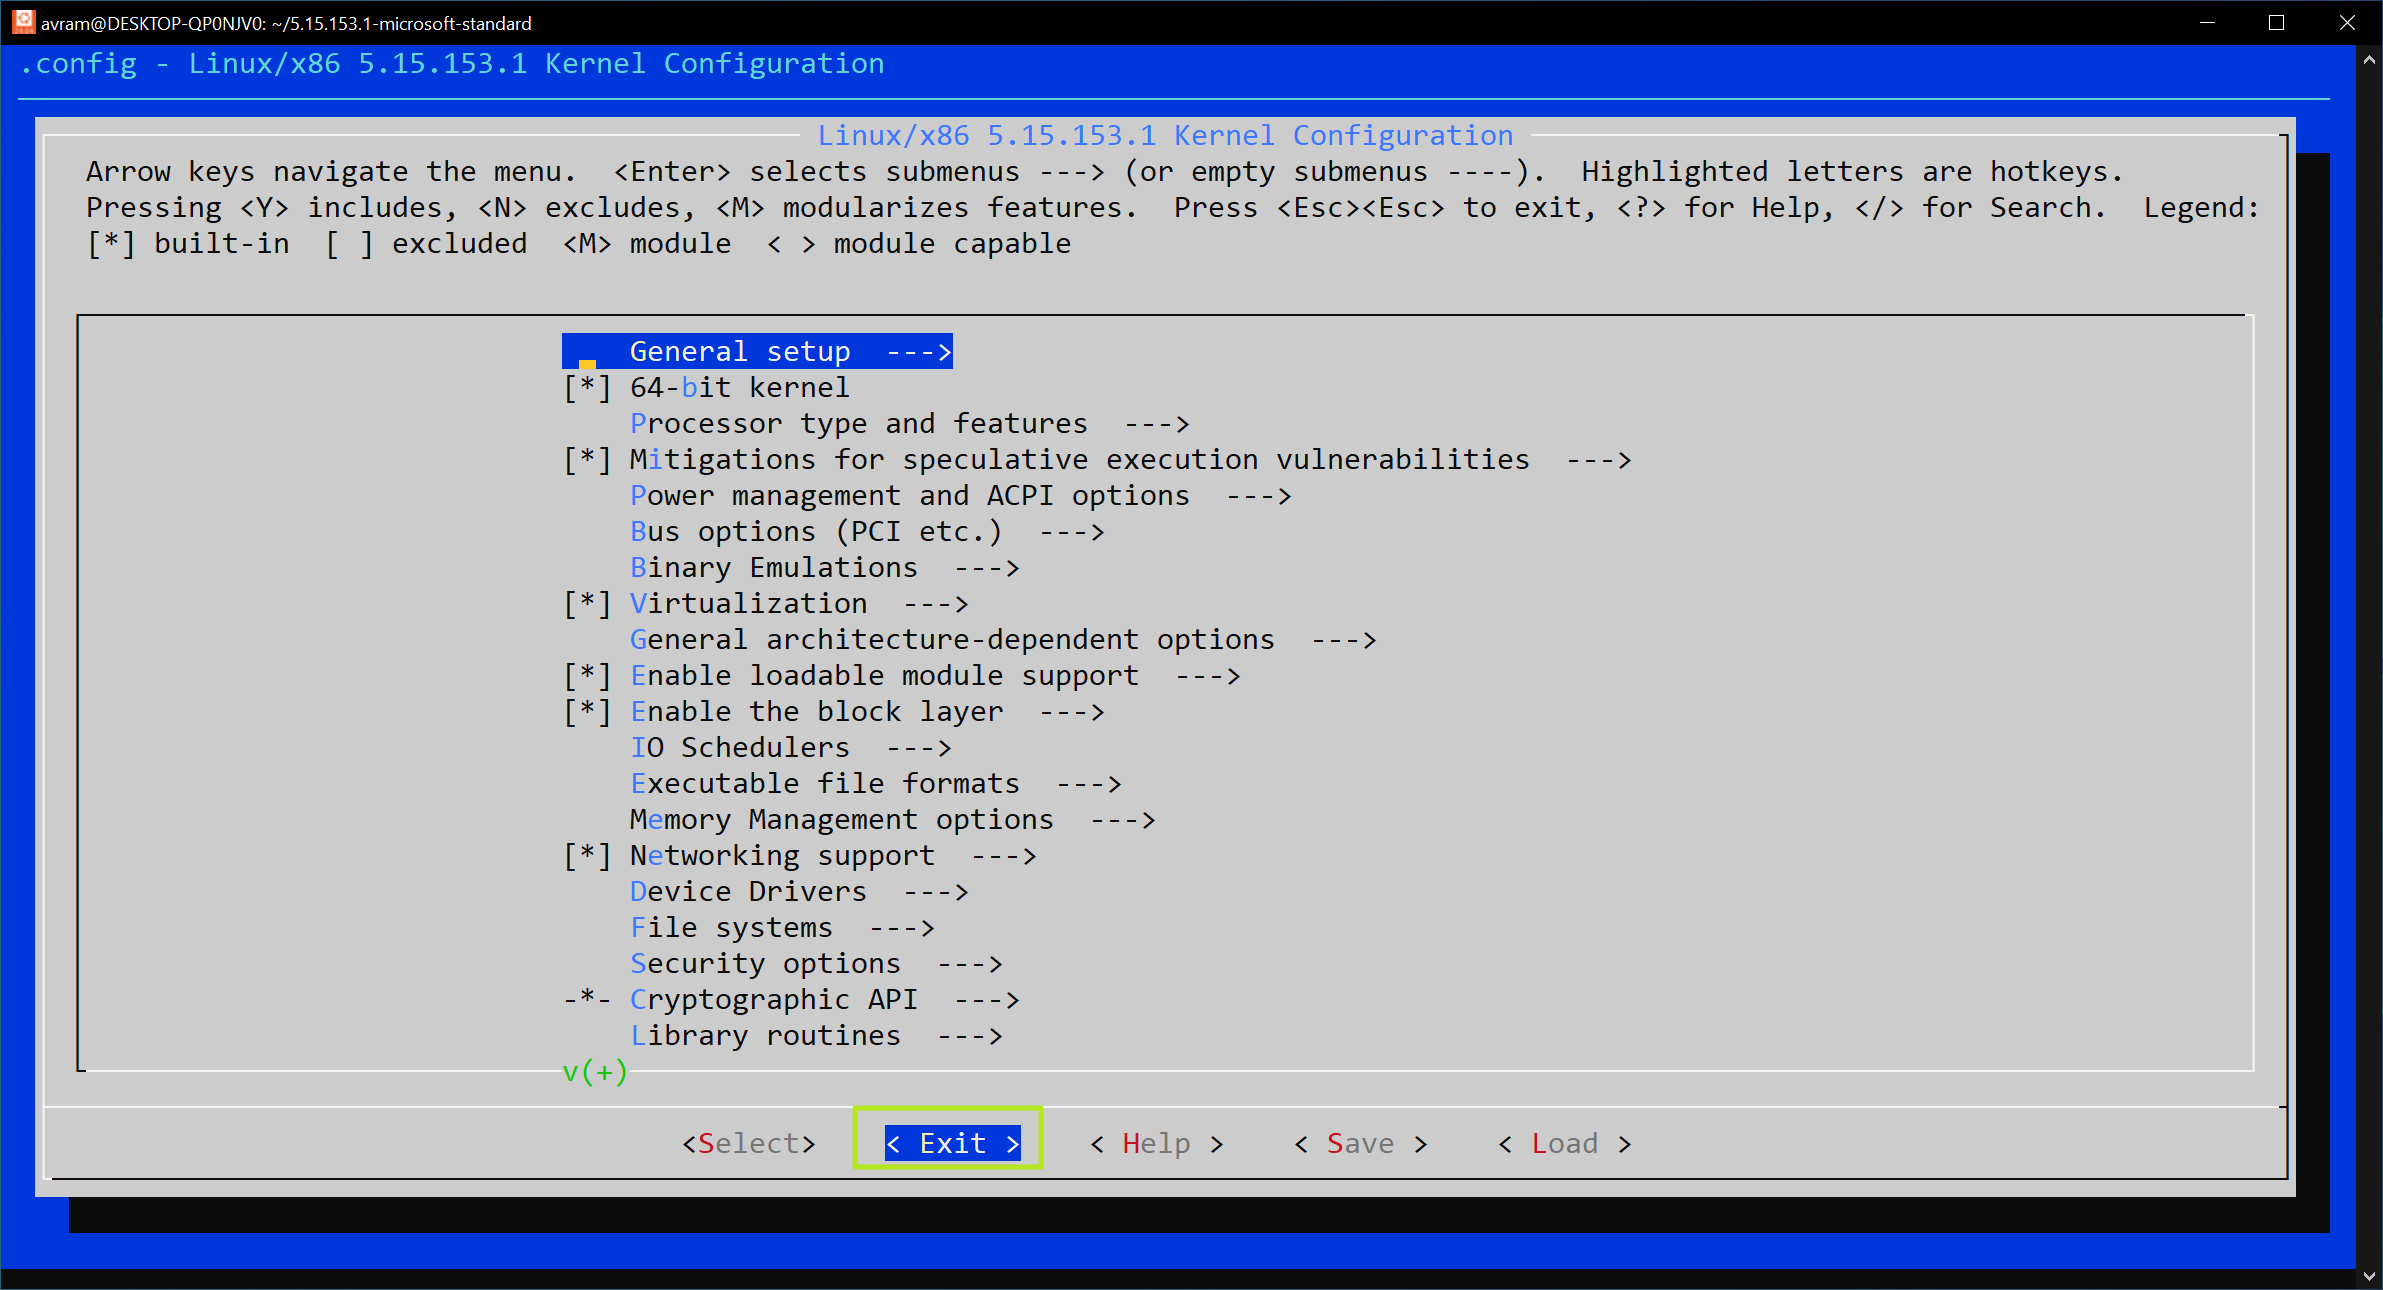
14.Select Exiton the bottom of the screen (using the Tab key) multiple times until you get asked to save.

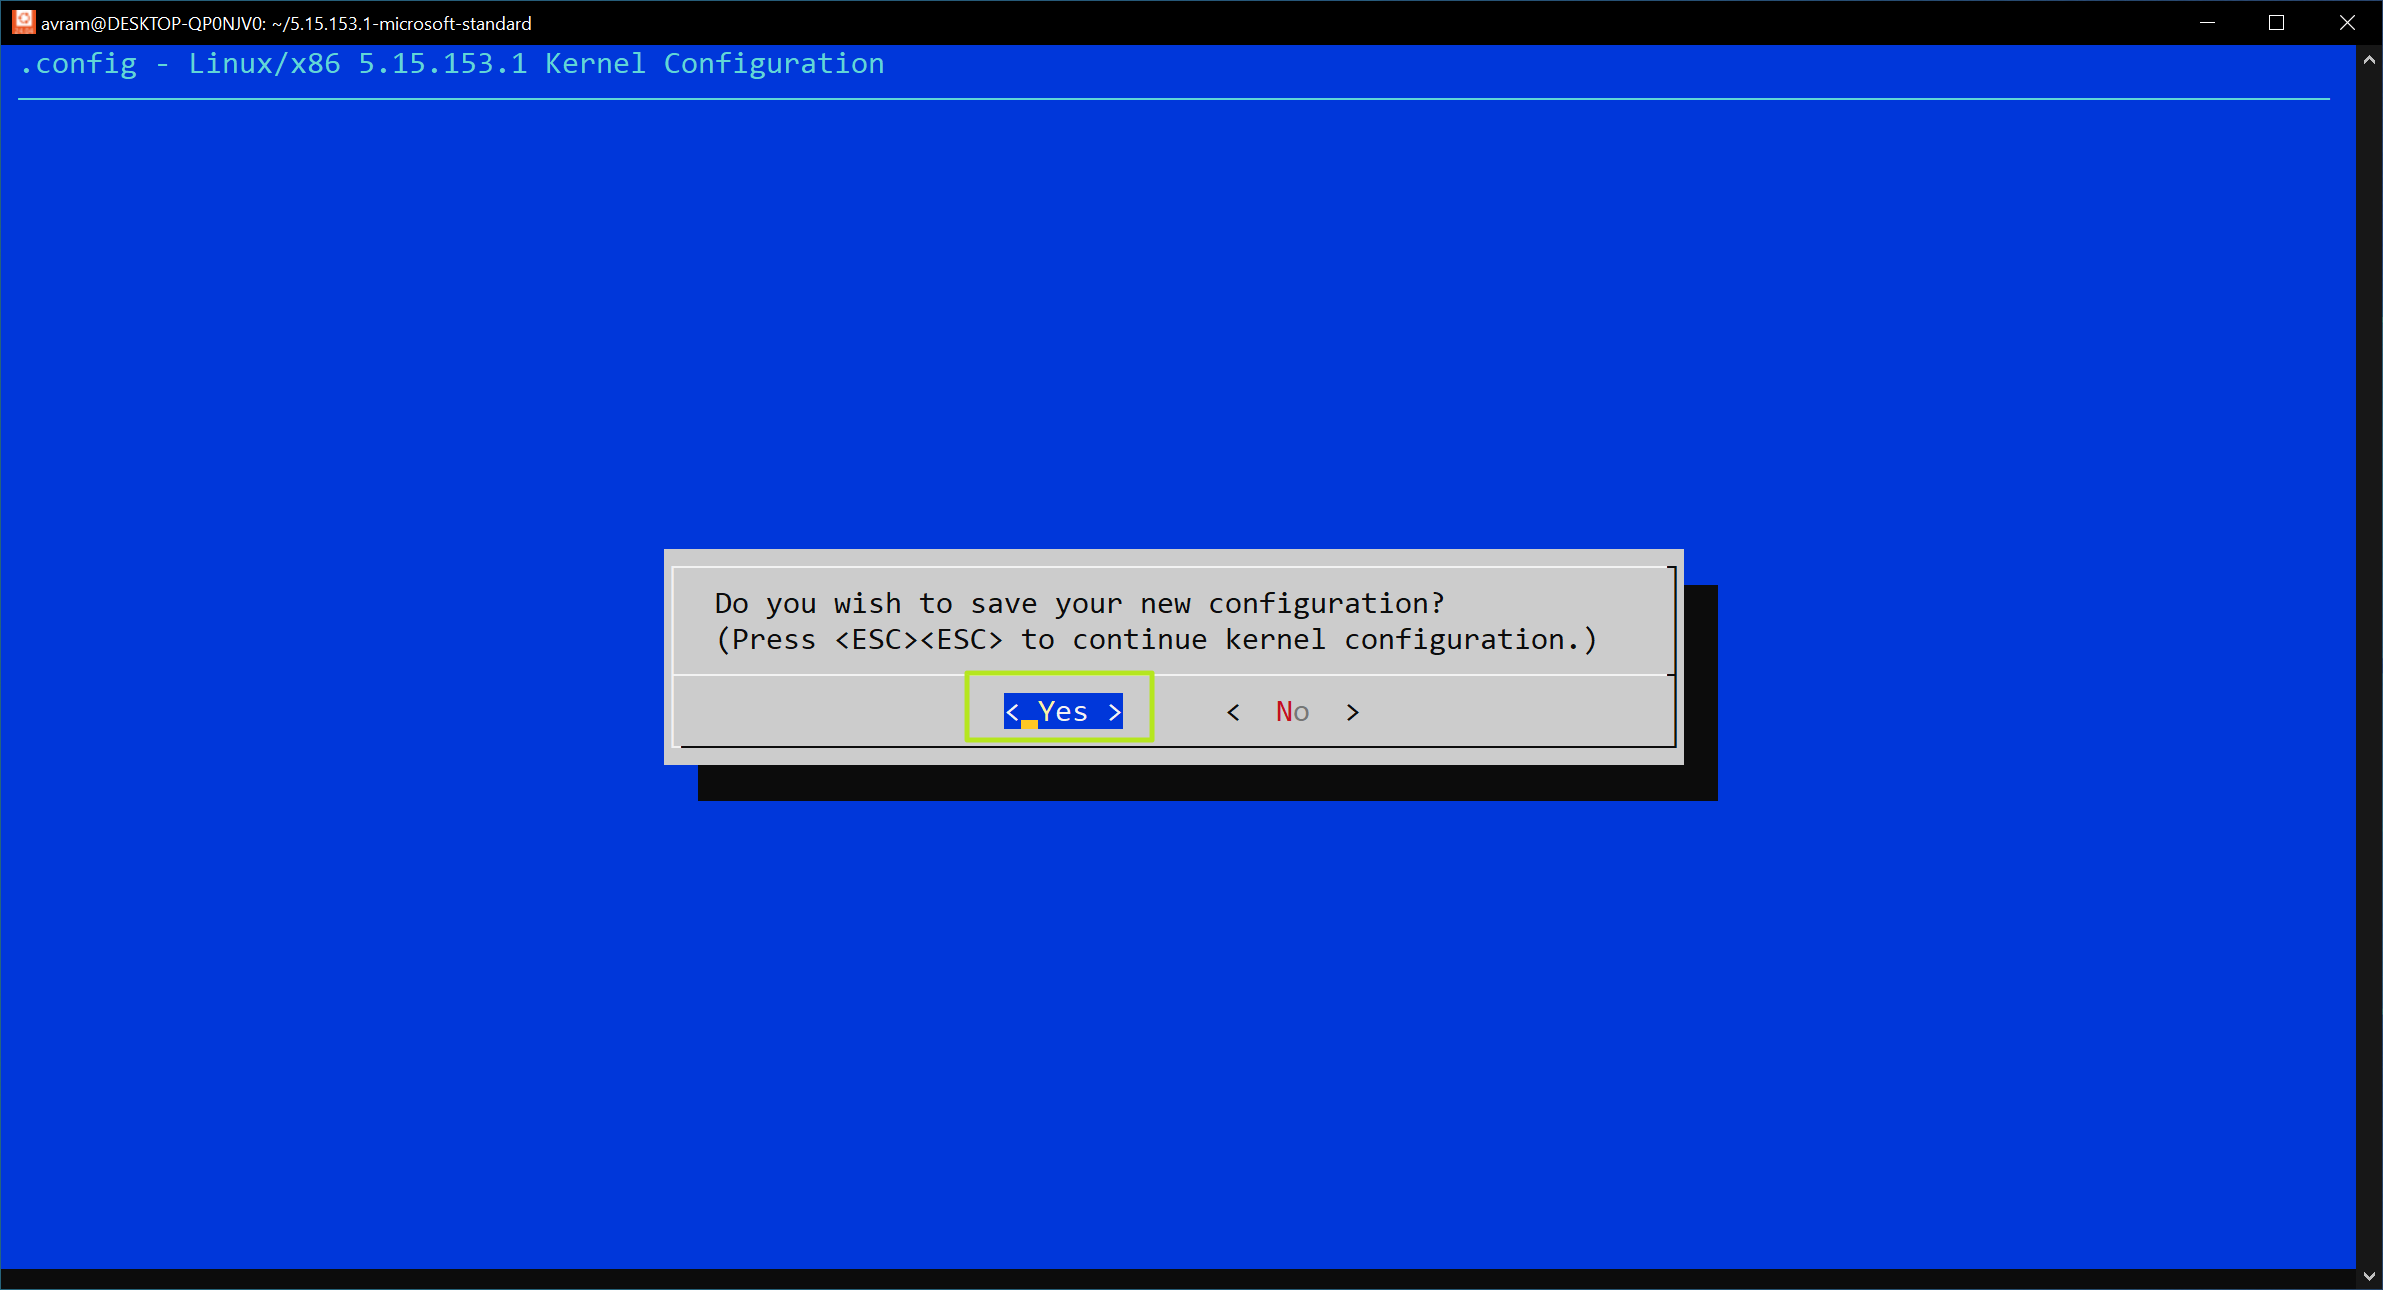
15.Select Yeswhen asked to save.
16.Enter the following make commands, one after the other. This process will take a few minutes.
17.Copy the vmlinux file to your user folder in windows. Replace [USERNAME] in the example below with your Windows user folder.For example my account is “avram” or /mnt/c/users/avram.
18.Change directory to your Windows user directory.
19.Open / create a text filein that directorycalled .wslconfig. Use nano to edit the file from within Ubuntu.
20.Enter the following text in the .wslconfig fileandsave it. Replace [USERNAME] with the correct folder name that matches your username. In my case, it was C:\users\avram\vmlinux.
23.Open Ubuntu.
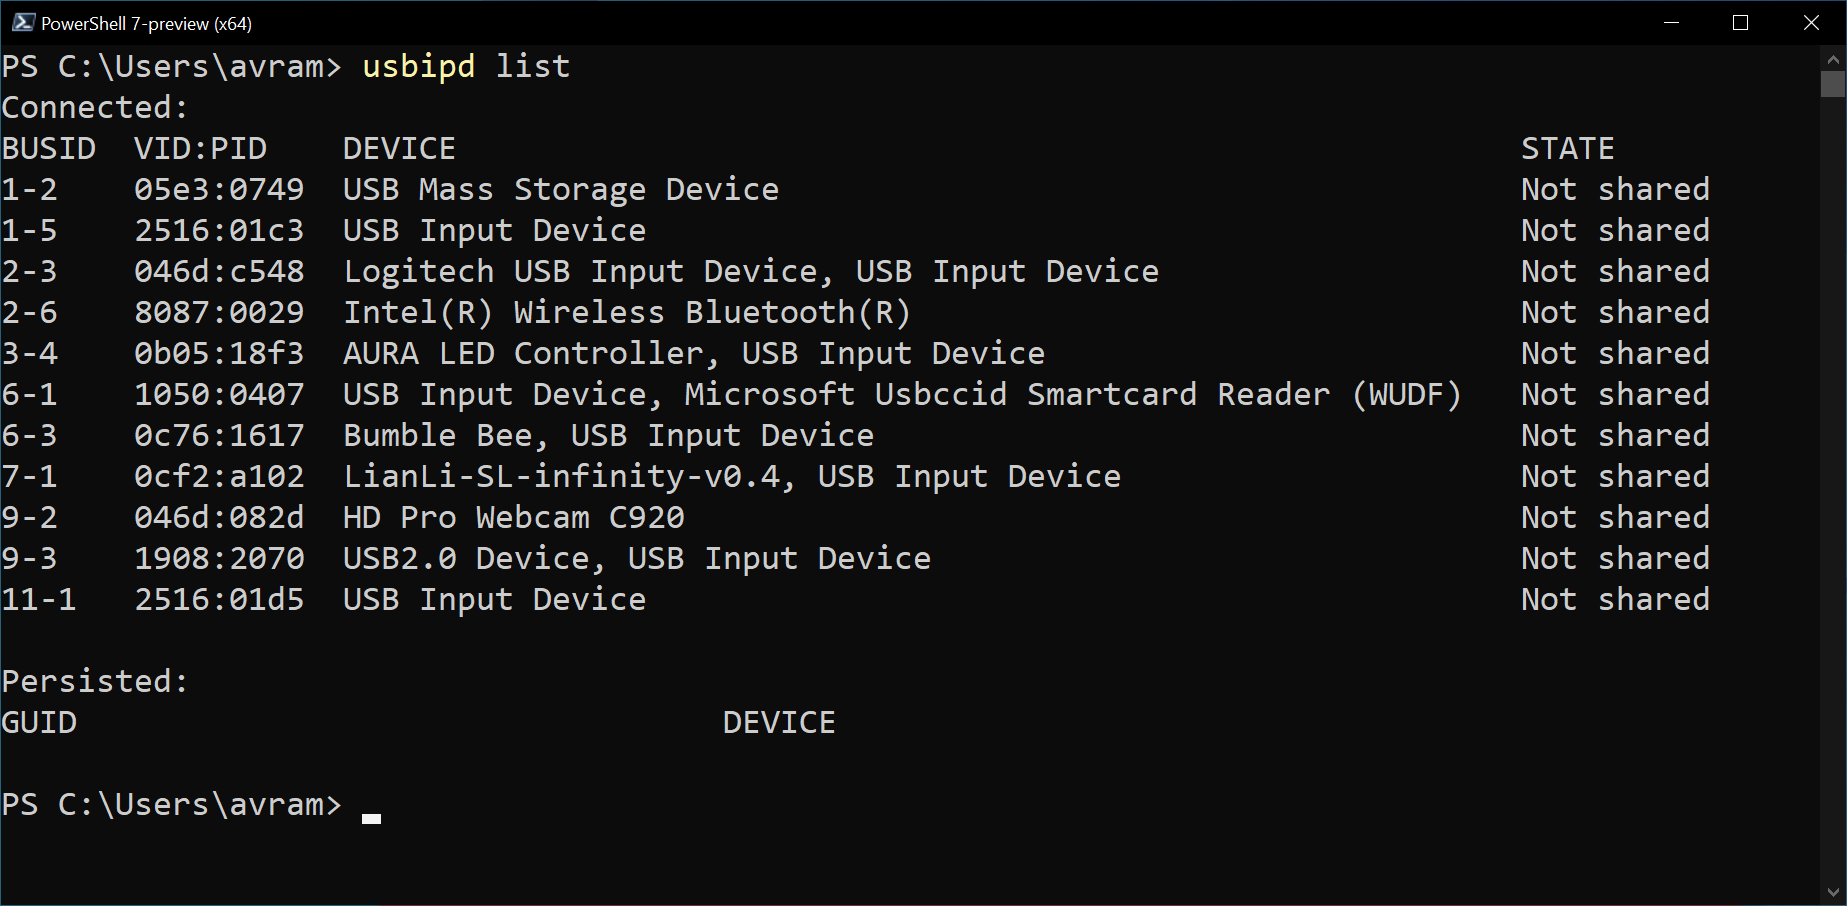
- In Powershell (opened as admin),list all available drivesby typingusbipd list.
Take note of the BUSID number of the USB Mass Storage Device, which is likely the USB disk you want to mount. In our case, the ID was 1-2.
25.Bind the drive by enteringusbipd bind –busid=[BUSID], replacing [BUSID] with the actual ID on the list. In our case, it wasusbipd bind –busid=1-2.
26.Attach the drive to wslby enteringusbipd attach –wsl –busid=[BUSID]
27.In Ubuntu, enterlsblkto see a list of drives.If everything worked, you’ll see your Flash drive / microSD card on the list. In the case of a Raspberry Pi microSD card, there will be two partitions listed. The first one is the /boot partition which is FAT and readable by Windows natively, but the second one is ext4.
On our system, the partitions on the microSD card were assigned as sdd1 and sdd2.
28.Make foldersin Ubuntu for mounting your partition(s) using mkdir and placing them under the /mnt directory. For example, we made /mnt/raspi but you could call your folder anything as long as it’s under /mnt.
29.Use the mount command to mount your partitionto the folder you created. Replace [PARTITION] with the actual partition name (ex: sdd2) and [FOLDER] with the one you created. In our case, this wassudo mount /dev/sdd2 /mnt/raspi.
30.Make the partition writableby using chmod 777. In our case, it wassudo chmod 777 /mnt/raspi. The chmod 777 command will make the partition readable and writable by any user. Typically this is a badsecuritypractice, but in this case it is viable given that we’re not working in a secure environment.
31.Locate the folderin Windows Explorer. It should be under Linux->Ubuntu->mnt. If you have a specific version of Ubuntu installed (in our case 24.04 LTS), it will be under that name instead of just Ubuntu. If you have a different version of Linux installed in WSL2, it will be under that.
You can now read from and write to that partition from Windows Explorer. You can close the Ubuntu window if you want or you can use the Ubuntu command line to copy files instead of using Windows Explorer.
The next time you want to mount a drive with ext4 on it, you simply need to use PowerShell and follow steps 23 to 31 to get it to show up in Windows Explorer. If you have an existing USB drive you have already mounted once and you unplug it and then plug it back in, it should continue to be available, at least if you haven’t shut down wsl and PowerShell.
Avram Piltch is Managing Editor: Special Projects. When he’s not playing with the latest gadgets at work or putting on VR helmets at trade shows, you’ll find him rooting his phone, taking apart his PC, or coding plugins. With his technical knowledge and passion for testing, Avram developed many real-world benchmarks, including our laptop battery test.
