Unlike most systems that supportXMP (eXtensive Memory Profile), ASUS AMD motherboards offer their own alternative version calledDOCP (Direct Overclock Profile). The two work exactly the same way and lets you achieve higher RAM speed with tested voltage and timings.
To set a DOCP profile on ASUS BIOS, get to the dedicatedD.O.C.P.section (inEZ mode) orAI Tweaker(inAdvanced mode). Then,select a profile,save the settings, andverify your system’s stability.
Ever since my beginning days of overclocking, I always had to putmore effort into the CPU. But when it comes to memory, selecting the preconfigured profile has always been enough for me (might not be the same for everybody though).
While manual overclocking is also a thing, today’s guide will be all about using DOCP on ASUS BIOS.
Check Compatibility
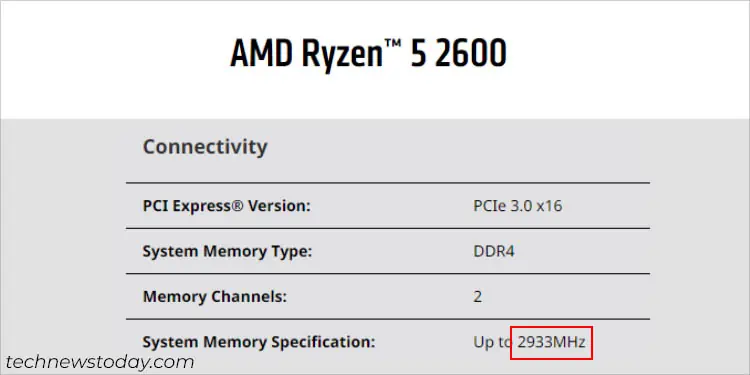
Before proceeding to activate the DOCP profile, it’s essential to ensure both your motherboard and the RAM stick(s) are XMP-compatible.
While we are talking about DOCP here, manufacturers use‘XMP’as the standard. Hence, the specifications available online will also mention the same.
I’ve always been saying this–overclocking is not the same for everyone!For some, with the same specified settings, you can achieve higher frequencies and for others, even the AMD-recommended DOCP profile may lead to performance degradation.
Keeping this thing in mind, the compatibility check you’ve done is just to get a general idea of how well your system could handle the overclock.

Note:Even though the ASUS DOCP profile is preconfigured (based on the maximum speed offered by the RAM stick and supported by the motherboard and processor), it’s still considered overclocking. For that reason, yourcomponents’ warranties will get void.
Get to ASUS BIOS Utility
Once you have checked the compatibility, it’s time toaccess the ASUS BIOS Utility. The process is quite simple–start/restart your computer and useDel or F2 keyonce you see the manufacturer logo on the monitor. Usually, there’s a short message at the bottom (as demonstrated above).
In case you have enabled Fast Boot or you do not wish to restart the computer, you may even get to the BIOS screen from the Windows Recovery Environment. Go toTroubleshoot>Advanced options>UEFI Firmware Settings>Restart.
Check Current RAM Frequency
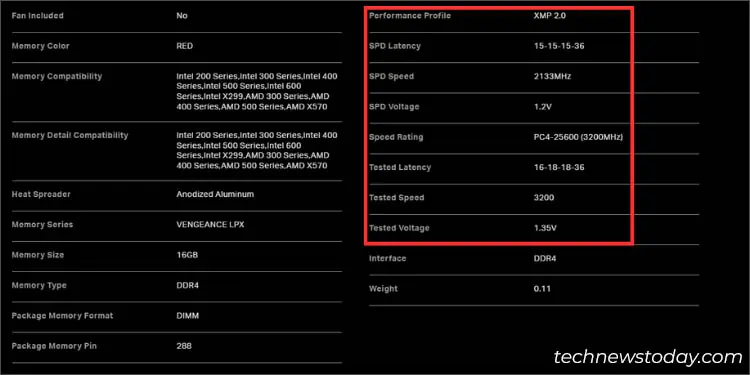
You have probably noticed that yourRAM never runs at the marketed speed. The one imprinted on the module’s sticker is rather the tested value, not theSPD frequency.
While you have already examined the specifications in the first step, it’s still a good idea to know the current memory settings. You can do so from bothEZandAdvancedmode on your ASUS BIOS.
On EZ Mode
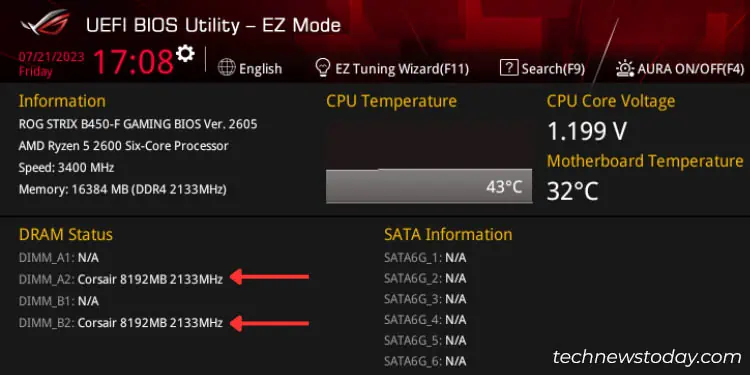
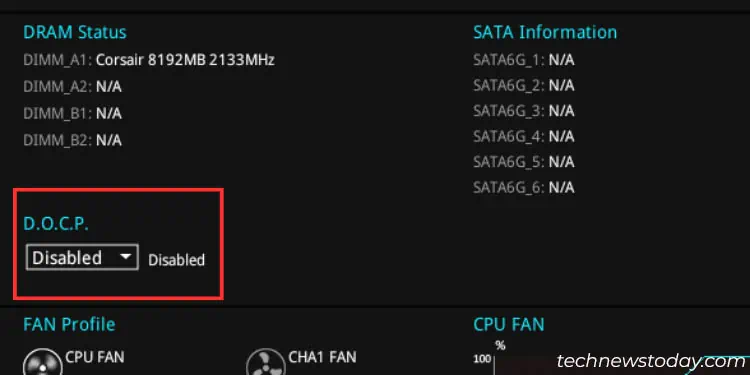
After you hit the BIOS key, you’ll enter EZ mode on most ASUS motherboards. Here, you may check theDRAM Statussection to know the current speed.
As per the above demonstration, myCorsairmemory sticks are both running at2133 Mhz(the same specified SPD speed on my manufacturer’s website).
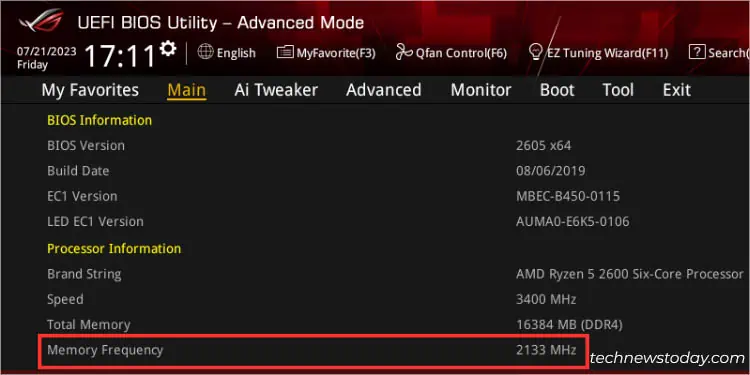
On Advanced Mode
In some motherboards, you might get to the ASUS Advanced Mode directly. Whether you check in EZ or Advanced mode, you’re going to see the same frequency.
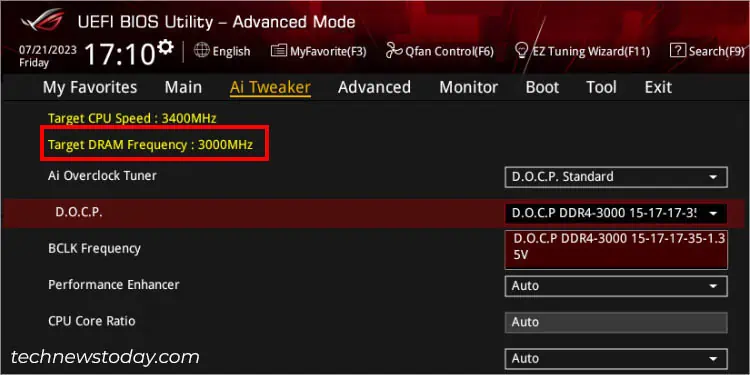
Switch to theMainwindow andcheck theMemory Frequencyfield in theProcessor Informationsection.
You can also identify this from theHardware Monitoron the right pane. If available, I also recommend checking the present timings and voltage.
Note:To quickly switch between the modes, useF7or click on theAdvanced/EZmode, which should be present at the bottom section of the BIOS window.
Enable DOCP Profile
Just like XMP profiles on ASUS Intel boards, AMD’s DOCP works by overclocking the frequency by adjusting the timings and voltage. Don’t worry–you don’t have to manage them yourself. The settings are predetermined and stored in theDIMM’s SPD chips.
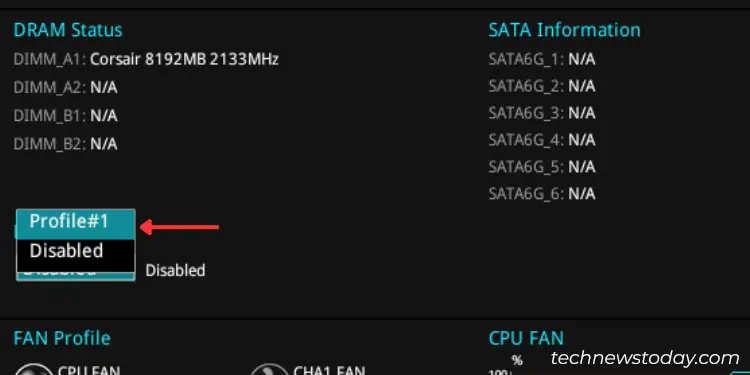
While most memory modules offer two DOCP profiles, some will only provide one. In my case, I was able to see just a single one even though my memory module supportedXMP 2.0.
If yours support multiple profiles, it’s always considered best topick the first one. This is because it offers a stable configuration in comparison to the other ones. The second or latter profiles (if supported) are a little more aggressive and may lead tosystem instabilities(as they are not compatible with every system).
Before You Begin:Since overclocking your memory isn’t 100% safe, I advisebacking up your current BIOS settingsin case you face any type of system instability.

Not all ASUS motherboards support tweaking the DOCP settings from the EZ mode. But if yours do, there’s no doubt that this is the quickest and easiest way, especially for beginners.
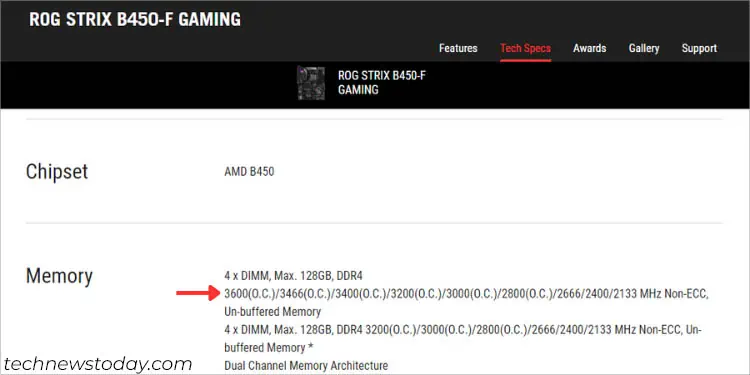
Sharing my experience, I didn’t find the dedicated option on myROG STRIX B450-F GAMINGmotherboard. However, myPrime B450 Plussupports it:
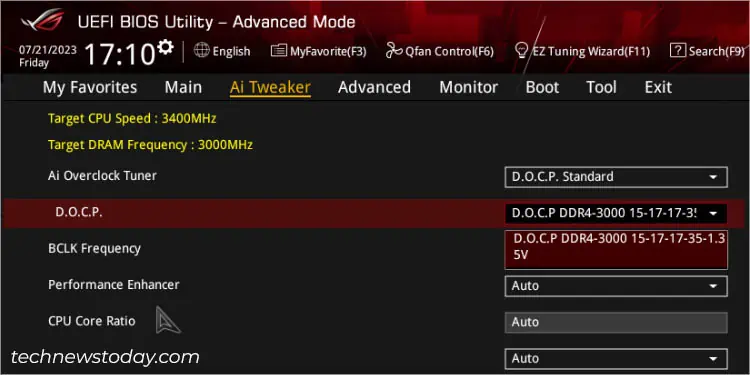
All the overclocking settings on ASUS BIOS are under theAi Tweakersection. Follow the below instructions to enable DOCP in Advanced Mode:
Save the Settings
After you have set the DOCP profile, it’s time to save the applied setting beforeexiting from BIOS/UEFI screen. You can navigate toExit>Save Changes and Reset.
However, I prefer pressing theF10 keydirectly. Either way, a confirmation dialogue box should pop up.
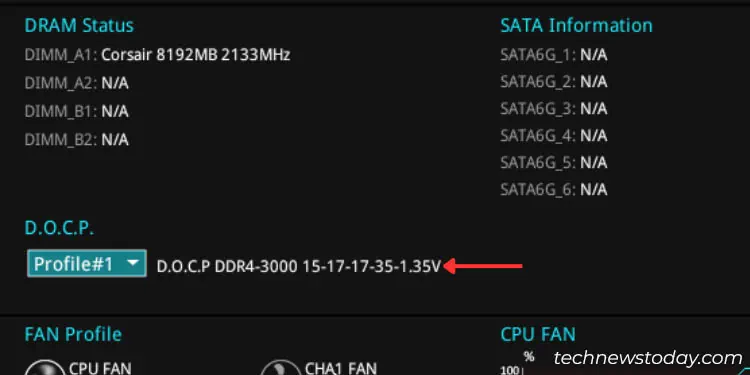
Here, you’re able to verifyBCLK Frequency,Memory Frequency,Latency,Read Delay,Write Delay,PRE Time,ACT Time, andDRAM Voltage. Then, hit theOkbutton and wait for your ASUS system to restart.
Verify Your New Settings
The final step is to ensure you’re getting the frequency as indicated by the set DOCP profile. You maycheck the RAM speedfrom BIOS, Windows Task Manager, or using other methods too.
After the verification, I alwaysrun a stability testto check whether my ASUS system can handle the OC settings. Here are some recommended tools you may use–MemTest86,Aida64 Extreme,Novabench, etc.
In case any failure occurs, it’s better to switch to another DOCP profile (if available) or just understand thatoverclocking is not for you. So, it’s better toreset your ASUS BIOSand load the earlier backed-up settings.
Since the DOCP values are tested by the manufacturer, you shouldn’t face issues in the first place. Sharing my experience, I’ve always kept it enabled and have never encountered any problems.
If your system is stable and you seek even more memory speed, you can do this manually. Follow my detailed guide that should help youoverclock your RAMin the easiest way possible.
